Advanced Configuration
This section includes the advanced configuration settings of Runecast Analyzer and may require console access to the virtual appliance. Runecast Analyzer runs in a virtual appliance running Ubuntu OS. For security purposes, SSH is disabled by default. You will need to use your vSphere Client to navigate to the Runecast Analyzer VM and open the VM console.
How to enable SSH access
By default, SSH is disabled. To enable the SSH access, follow these steps:
-
From the VMware vSphere Client select the Runecast Analyzer VM and open the VM console accessible from the Summary tab.
-
Login with
rcadminuser (default password:admin). -
Navigate to Remote Access and press Enter.
-
Select Enable SSH and press Enter.
-
Navigate to Logout and press Enter to log out of the interface.
How to replace the self-signed SSL certificate
By default, the connection to the Runecast Analyzer web interface is secured using a self-signed SSL certificate. We recommend replacing it with a CA-signed certificate. After you obtain the certificate in the PEM format, you can replace the default one following the steps below:
Info
Runecast Analyzer supports X.509 certificates in the PEM format to encrypt session information sent over SSL connection.
-
If SSH access is not enabled, please see section How to enable SSH access.
-
Initiate SSH session to Runecast Analyzer.
-
Login with
rcadminuser. -
In the directory
/etc/runecast/cert, rename the existing certificates:sudo mv rc2.crt orig.rc2.crt sudo mv rc2.key orig.rc2.key -
Copy the new certificate and key to
/etc/runecast/cert.-
from the appliance initiate file transfer:
sudo scp <username>@<remoteHost>:/location/<your file>.crt /etc/runecast/cert/<your file>.crt sudo scp <username>@<remoteHost>:/location/<your file>.key /etc/runecast/cert/<your file>.key -
as an alternative, you can copy the certificate files to Runecast Analyzer using SCP client. In this case, you will not be able to upload them directly to
/etc/runecast/cert/directory. Initially, they can be placed in the/tmpdirectory and then moved with elevated privileges:sudo mv /tmp/<your file>.crt /etc/runecast/cert/<your file>.crt sudo mv /tmp/<your file>.key /etc/runecast/cert/<your file>.key
-
-
In the directory
/etc/runecast/certrename the new certificate and key torc2.crtandrc2.key:sudo mv <your file>.crt rc2.crt sudo mv <your file>.key rc2.key -
The copy process of the certificate files to Runecast Analyzer may not assign the proper permissions. Please review them by using the following command:
ls -la /etc/runecast/cert/ -
If the permissions on your new certificate files are not
root:rctomcatrun the commands below:sudo chown root:rctomcat rc2.crt sudo chown root:rctomcat rc2.key sudo chmod 640 rc2.crt sudo chmod 640 rc2.key -
If your key is password-protected, add the password into
/etc/runecast/nginx/ssl_passwords.txtfile using the following command:echo "<password>" | sudo tee /etc/runecast/nginx/ssl_passwords.txt -
Restart the nginx service:
sudo systemctl restart nginx
Tip
If after performing the steps the certificate is still untrusted in the browser, make sure:
- The certificate contains the SAN field.
- The certificate
.crtfile includes all the intermediate certificate authorities certificates. The file should start with the appliance certificate.
Note
If after changing the certificate and restarting nginx the daemon fails to start, review the file permissions (step 8). If the certificate is password protected, make sure you set the password (step 9).
How to configure a Proxy Server
Runecast Analyzer can be configured to use a proxy server facilitating external connectivity. To achieve this, follow one of the two methods described below.
Proxy configuration using Console Interface
-
Open the Runecast Analyzer appliance console.
-
Login with
rcadminuser. -
Navigate to Proxy Settings and press Enter.
-
Provide the Proxy server and Proxy port and optionally the Username and Password.
-
Press Enter to validate the configuration.
-
Navigate to Logout and press Enter to log out the console interface.
Proxy configuration using REST API
You can configure proxy via the Runecast Analyzer REST API. One convenient way to do it is via the built-in API browser:
-
Navigate to Settings > API Access tokens
-
Click the Explore API Documentation link and expand the Configuration list. Select the desired method (PUT, GET, DELETE) for
/api/v1/config/system/proxy -
To configure the proxy, you need to provide proxy server address and port and optionally username and password.
Example API call body:
{
    "authenticated": true,
    "configured": true,
    "password": "password",
    "port": 3128,
    "server": "proxy.example.com",
    "user": "user"
}
How to disable the session timeout for the web interface of Runecast Analyzer
The web interface of Runecast Analyzer has a default session timeout value of 15 minutes. For security reasons, it is advised to keep the default.
To perform the changes, navigate to Settings > API Access tokens. Click on Explore API Documentation, expand the Configuration section and find the session timeout GET and PUT operations URL /api/v1/user-settings/session-timeout and use the calls to find and update the settings.
Alternatively, you can use the following API call to check the state of the session timeout:
curl -X GET -H "Authorization: <your API token>" -H 'Accept: application/json;charset=UTF-8' 'http://<appliance IP>/rc2/api/v1/user-settings/session-timeout'
To disable the timeout, use the following API call:
curl -X PUT -H "Authorization: <your API token>" -H "Content-Type: application/json;charset=UTF-8" http://<appliance IP>/rc2/api/v1/user-settings/session-timeout -d '{"sessionTimeoutEnabled": false}'
Tip
Replace
Reboot the appliance for the changes to have effect.
How to change Runecast Analyzer network configuration
Network configuration can be set during .ova deployment. If later changes are needed, they can be performed following one of the described methods.
In the vApp Options
-
Shut down the Runecast Analyzer appliance VM.
-
Using the vSphere Web Client, right click on the VM and select Edit Settings.
-
From the newly opened window select vApp Options.
-
Expand Networking properties and edit the DNS field to the desired value.
-
Confirm the changes by clicking OK button on the Edit Settings window.
-
Power On the Runecast Analyzer VM.
From Runecast Console Interface
-
Open the Runecast Analyzer appliance console.
-
Login with
rcadminuser. -
Navigate to Network Settings and configure the parameters as desired. If DHCP is required, set the DHCP field value to
true.
Note
Once the network properties are reconfigured through the Runecast Console Interface, the network configuration is marked as Internally managed and further changes via vApp Options will be discarded.
How to set up Custom Repositories with Runecast Analyzer
If you want to limit access to the internet where possible, then you can create your own internal Runecast repository and point all your Runecast Analyzer appliances to this repo. By maintaining a single repository internal to the network you can save on bandwidth and also minimize the attack surface of your Runecast Analyzer appliances.
Building the repository
Before setting up a local mirror of the Runecast online repository, to repoint your Runecast Analyzer appliances to utilize this local mirror, you need to deploy a virtual machine to host this repository. Allocation of 2vCPU and 4Gb of RAM should cover all most use-cases. The OS should be one that uses Aptitude as its update engine, you should install SSH server for remote administration, and allow around 10 GB for the mirrored data.
Once the VM is deployed, connect over with SSH and install the required software by running:
sudo apt update
sudo apt install apache2 apt-mirror
Before performing any changes to the mirror.list file (which tells apt-mirror which sources to download a copy of) make a backup copy of the file in case a restore will be required in the future.
sudo cp /etc/apt/mirror.list /etc/apt/mirror.list.bak
sudo vi /etc/apt/mirror.list
This file should read as follows. You can either delete the extra lines or comment them out.
set base_path /var/spool/apt-mirror
set run_postmirror 0
set nthreads 20
set _tilde 0

deb https://updates.runecast.com/runecast-analyzer-vmware /
clean https://updates.runecast.com/runecast-analyzer-vmware
Run a manual sync.
sudo -u apt-mirror apt-mirror
A bundle of files should be downloaded. The next step is to enable the Apache web server to serve this content up, so that your internal Runecast Analyzers can pull their updates from it. Configure the Apache DocumentRoot to point to the local mirror directory.
sudo ln -s /var/spool/apt-mirror/mirror /var/www/html/mirror
sudo vi /etc/apache2/sites-enabled/000-default.conf
In the file that opens in your text editor enter the following.
DocumentRoot /var/www/html/mirror/updates.runecast.com
Save the file, and then restart Apache.
sudo systemctl restart apache2
Then, configure Apache to start automatically on bootup.
sudo systemctl enable apache2
Our final step to configure this VM is to enable a scheduled task to automatically download the updates from the online Runecast repository.
sudo vi /etc/cron.d/apt-mirror
In the file that opens, uncomment the following line
0 4 *** apt-mirror /usr/bin/apt-mirror > /var/spool/apt-mirror/var/cron.log
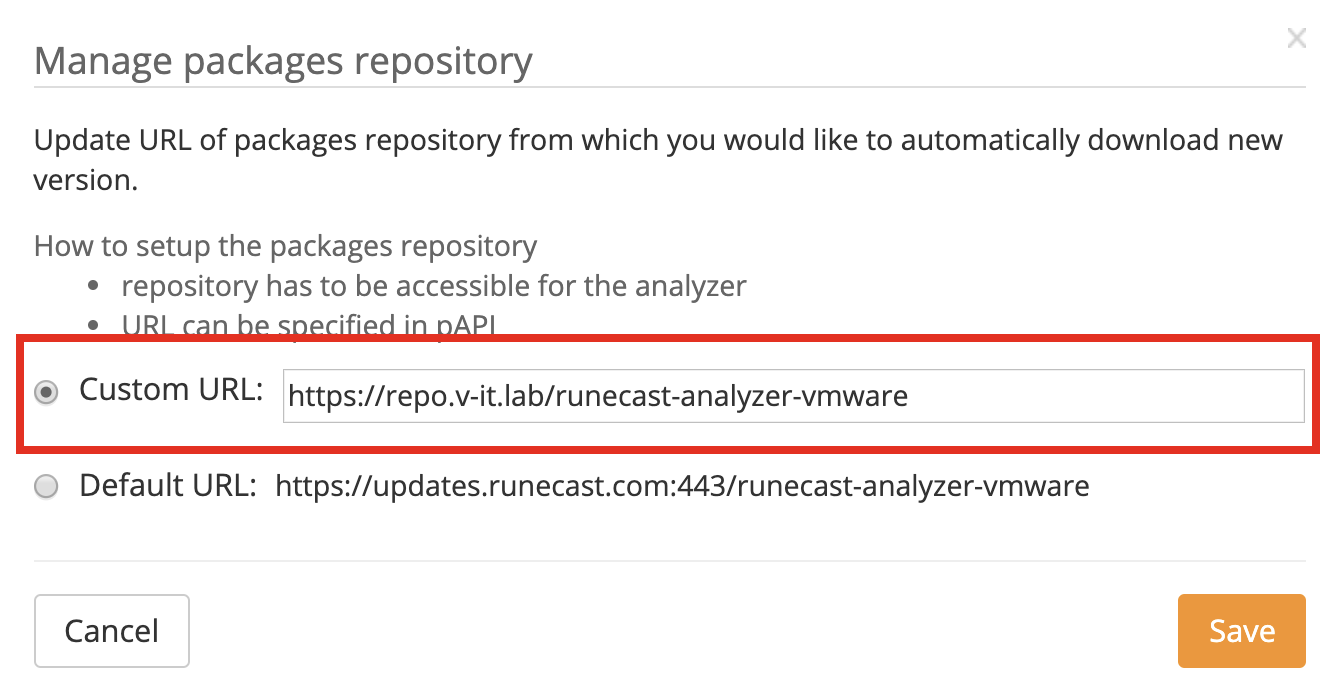
At this point, you can configure your Runecast Analyzer appliances to use this server in order to pull updates. Navigate to Settings > Update and change both the Runecast Analyzer and Knowledge Definitions URLs to point to your local repository.
How to change address of Knowledge updates repository
By default, Runecast Analyzer is downloading the definition updates from the address https://updates.runecast.com/definitions.
To perform the changes, navigate to Settings > API Access tokens. Click on Explore API Documentation, expand the Configuration section and find the definitions repository calls /api/v1/user-settings/definitions-repository and /api/v1/user-settings/packages-repository.
To check the current repository location, the following API call can be used:
curl -X GET -H "Authorization: <your API token>" -H 'Accept: application/json;charset=UTF-8' http://<appliance IP>/rc2/api/v1/user-settings/definitions-repository'
To create your own repository and use it as download location for Knowledge updates execute the following API call:
curl -X PUT -H "Authorization: <your API token>" -H "Content-Type: application/json;charset=UTF-8" http://<appliance IP>/rc2/api/v1/user-settings/definitions-repository -d '{"url":"https://<your repository IP>/definitions/","versionFilename":"version.txt","updatesFilename":"rca-definition.bin"}'
Tip
Replace <your API token> by a valid token, <appliance IP> by your appliance DNS or IP address and
Both files version.txt and rca-definition.bin should be placed in your repository.
-
version.txtrequires the following format (example):appversion=4.1.1.0 defversion=4.1.1.1 defdate=2020-01-16 appdate=2020-01-14 -
rca-definition.bincan be downloaded from your profile on https://portal.runecast.com/
Warning
If the files are not properly configured the updates will behave as in offline mode.
Reboot the appliance for the changes to have effect.
How to change the TLS protocol version or supported encryption ciphers
By default, Runecast Analyzer supports the TLS protocols TLSv1.2 and TLSv1.3.
Tip
To find out more information about TLS settings across VMware products, please follow the knowledge base article https://kb.vmware.com/s/article/2145796.
In case you require different settings, please follow these steps:
-
If SSH access is not enabled, please see section How to enable SSH access.
-
Initiate SSH session to Runecast Analyzer.
-
Login with
rcadminuser. -
Edit the configuration file with
nano /etc/runecast/nginx/ssl.confand modify as required.Info
To see the supported configuration keywords, please see:
- https://nginx.org/en/docs/http/ngx_http_ssl_module.html#ssl_protocols for list of TLS protocol versions
- https://www.openssl.org/docs/manmaster/man1/openssl-ciphers.html for list of ciphers
- https://nginx.org/en/docs/http/ngx_http_ssl_module.html#ssl_protocols for list of TLS protocol versions
-
Restart the nginx service:
sudo systemctl restart nginx
How to configure remote audit logging
For security purposes, you can enable Runecast Analyzer audit logging. These additional log messages contain information about the user interaction with Runecast Analyzer such as sign in, sign out, filter creation and more.
You can configure audit login via the Runecast REST API. One convenient way to do it is via the built-in API browser:
-
Navigate to Settings > API Access tokens.
-
Access the Explore API Documentation link and expand the Configuration list. Select the desired method (PUT, GET, DELETE) for
/api/v1/config/system/audit/syslog. -
To configure the remote audit logging, you need to provide syslog server address, port and protocol type.
Example API call body:
{
    "host": "10.0.0.1",
    "port": 514,
    "protocol": "UDP"
}
Note
Even if a remote syslog server is configured, the logs are still available locally on the appliance.
How to enable TLS in Log Analysis
Requirements:
- certificate
rca-syslog.crtand keyrca-syslog.keyfiles in PEM format - the certificate chain is trusted by the ESXi server
Tip
If the ESXi server doesn't trust the certificate already, add any issuing authority certificates to the ESXi server before configuring the secure syslog connection.
esxcli system security certificatestore add -f /tmp/ca.crt
Command reference: https://developer.vmware.com/docs/1499/vsphere-cli/doc/esxcli_system.html
To secure the log communication between your vSphere infrastructure and Runecast Analyzer, follow these steps:
-
Enable the TLS syslog listener on Runecast Analyzer
- Copy the certificate and key files to the location
/usr/local/rclogstash/config/cert - Ensure that file permissions are properly set, by running commands:
sudo chown root:rclogstash /usr/local/rclogstash/config/cert/rca-syslog* sudo chmod 644 /usr/local/rclogstash/config/cert/rca-syslog.crt sudo chmod 640 /usr/local/rclogstash/config/cert/rca-syslog.key ls -l /usr/local/rclogstash/config/cert -rw-r--r-- 1 root rclogstash 1879 Mar 15 08:16 rca-syslog.crt -rw-r----- 1 root rclogstash 1679 Mar 15 08:16 rca-syslog.key - Restart the
rclogstashservice:sudo systemctl restart rclogstash
- Copy the certificate and key files to the location
-
Configure the secure syslog connection on ESXi servers
-
Set the syslog host:
esxcli system syslog config set --loghost ssl://<rca-fqdn>:1514Tip
If more than one syslog server connections are needed, enter comma separated list. To list the currently set syslog servers use the following command:
esxcli system syslog config get | grep "Remote Host:" -
Reload the syslog daemon for the change to take effect:
esxcli system syslog reload
-
How to extend the disks
Each hard disk drive of the Runecast Analyzer VM can be expanded following the procedure below:
-
Power off the Runecast Analyzer VM.
-
Locate the Runecast Analyzer VM in the VMware vSphere Client and select Edit Settings.
-
Extend the disks to the desired size:
-
Hard Drive 1 - root volume
-
Hard Drive 2 - database storage
-
Hard Drive 3 - log storage
-
-
Power on the Runecast Analyzer VM. The file system will be automatically expanded.
How to uninstall the Runecast Analyzer Plug-in
The process to uninstall the Runecast Analyzer plugin should only take a couple of minutes using the following procedure:
-
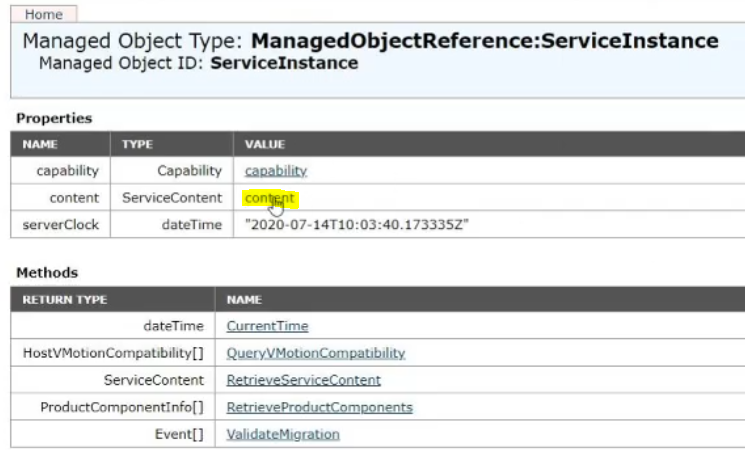
Log in to the VMware vCenter MOB interface using an administrators account.
To interact with the SOAP APIs, you need to login to the MOB interface as an administrator using the URL
https://<vCenter address>/mob. -
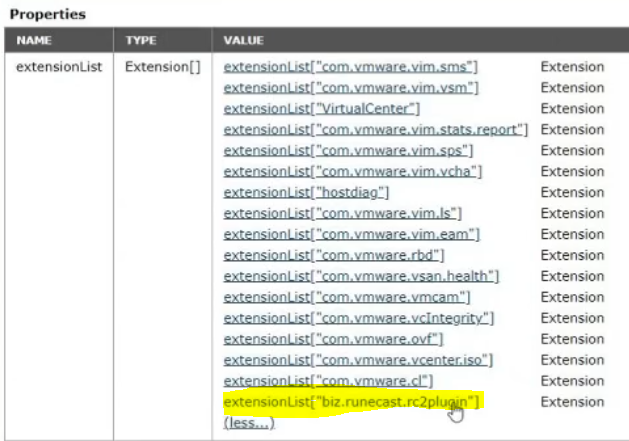
Select content under Properties.
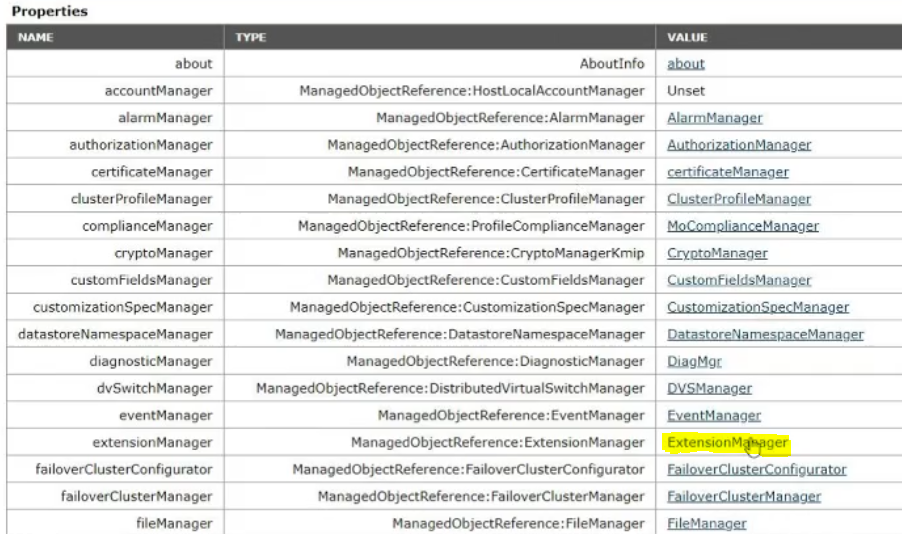
-
Select the ExtensionManager link
-
Click the more button to list all the extensions.
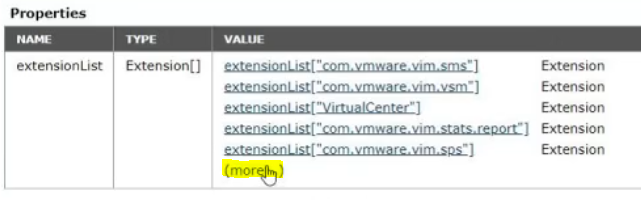
-
You will see the Runecast plugin in the extension list.
-
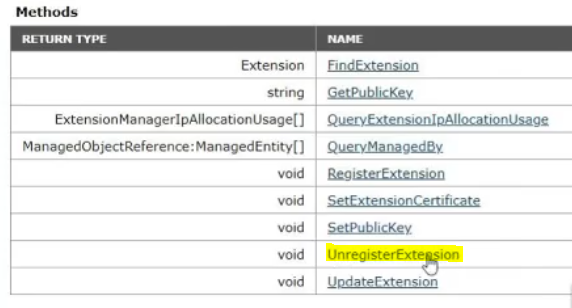
Scroll down and select Unregister Extension.
-
Enter
biz.runecast.rc2plugininto the extensionKey value and then select Invoke Method.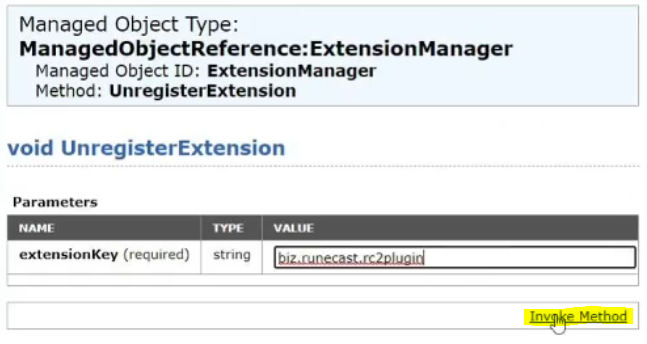
If you now go back to the ExtensionManager screen, you will see that the plugin is no longer present.
-
You will need to log out and log back into the vCenter before you no longer see the Runecast plugin in vCenter.
How to set up time synchronization
By default, the VM time is not synchronized using VMware Tools and Runecast synchronizes time with Ubuntu NTP servers. If you would like to set up time synchronization with the external source from within the appliance, please follow these steps:
-
If SSH access is not enabled, please see section How to enable SSH access.
-
Initiate SSH session to Runecast Analyzer.
-
Run the following command to set up the desired timezone:
The default timezone issudo timedatectl set-timezone <Country>/<City>Europe/London. For a complete list of available Country/City pairs, runtimedatectl list-timezones. -
Edit the
timesyncd.confconfig file to set up NTP servers:sudo nano /etc/systemd/timesyncd.conf -
Uncomment the
NTPline and set the desired NTP server(s) as follows:NTP=ntp1.domain.local ntp2.domain.local -
Save and close the file (Ctrl+S, Ctrl+X)
-
Restart the NTP service:
sudo systemctl restart systemd-timesyncd
How to upgrade Runecast Analyzer from version below 6.0
In case your Runecast Analyzer is older than version 6.0, the direct update to the latest version is not supported. There is an intermediate version available for this case. Here are the steps required:
-
Download Runecast updates ISO file for version 6.0.0.0 from https://updates.runecast.com/hotfixes/rcupdate-6.0.0.0.iso
-
Attach the downloaded ISO file to the Runecast Analyzer VM and follow offline update method.
-
Wait for the appliance to be fully updated to version 6.0. Verify it by logging-in to the web interface at
https://<RCA_IP>/rc2. -
Update Runecast Analyzer using offline method to the version 6.5.0.0 as described below.
How to upgrade Runecast Analyzer from version below 6.5
In case your Runecast Analyzer is older than version 6.5, the direct update to the latest version is not supported. There is an intermediate version available for this case. Here are the steps required:
-
Download Runecast updates ISO file for version 6.5.0.0 from https://updates.runecast.com/hotfixes/rcupdate-6.5.0.0.iso
-
Attach the downloaded ISO file to the Runecast Analyzer VM and follow offline update method.
-
Wait for the appliance to be fully updated to version 6.5.0.0. Verify it by logging-in to the web interface at
https://<RCA_IP>/rca. -
Update Runecast Analyzer using offline method to the version 6.5.3.0 as described below.
How to upgrade Runecast Analyzer from version below 6.5.3.0
In case your Runecast Analyzer is older than version 6.5.3.0, the direct update to the latest version is not supported. There is an intermediate version available for this case. Here are the steps required:
-
Download Runecast updates ISO file for version 6.5.3.0 from https://updates.runecast.com/hotfixes/rcupdate-6.5.3.0.iso
-
Attach the downloaded ISO file to the Runecast Analyzer VM and follow offline update method.
-
Wait for the appliance to be fully updated to version 6.5.3.0. Verify it by logging-in to the web interface at
https://<RCA_IP>/rca. -
Update Runecast Analyzer using online/offline method to the latest version available.