System Requirements
The following sections detail the capacity and configuration requirements for the deployment of Runecast Analyzer. Customers can deploy the application on supported platforms:
- VMware vSphere as a pre-packaged OVA image available on the Runecast Portal or the VMware Marketplace
- Amazon AWS as a pre-built AMI image available on the AWS Marketplace
- Microsoft Azure as a pre-built image available on the Azure Marketplace
To access the Runecast Analyzer Web Interface after deployment, please use one of the supported browsers.
VMware vSphere
- VMware vSphere infrastructure should already be deployed. ESXi hosts must be v6.x and above, and these must be managed by vCenter v6.x or v7.x.
-
The Runecast Analyzer appliance is typically deployed into an existing vSphere infrastructure. Appropriate resource allocation for the appliance is selected during the deployment process. The standard sizing options are small/medium/large; with resources allocated as follows:
Note
If you plan to use OS analaysis, use Medium or Large sized appliance.
-
Small (use this configuration for small environments: up to 50 Hosts)
- 2 vCPU
- 12 GB RAM
- 120 GB Storage
- 100 Mbit network (1 Gbit or above recommended)
-
Medium (use this configuration for medium environments: up to 150 Hosts)
- 4 vCPU
- 16 GB RAM
- 120 GB Storage
- 100 Mbit network (1 Gbit or above recommended)
-
Large (use this configuration for large environments: up to 1200 Hosts)
- 8 vCPU
- 32 GB RAM
- 120 GB Storage
- 100 Mbit network (1 Gbit or above recommended)
-
-
Internet Connectivity - Runecast Analyzer is packaged as a virtual appliance in OVA format that is deployed into your virtual infrastructure. All data and logic necessary for full operation are contained in the appliance. No data is transmitted from the Runecast Analyzer outside of your datacenter. Optionally, customers can connect the Runecast Analyzer to the Internet to download zero-touch updates for knowledge definitions and application updates. An entirely off-line update mechanism is provided using files (.ISO and .bin) made available from the user portal.
AWS
- An active AWS account is required to deploy Runecast Analyzer.
- Deployment requires the following resources (customers can reuse existing resources):
- VPC
- Network subnet with Internet Gateway attached
- Security Group allowing the following incoming communication:
- Ports TCP 443 (HTTPS) and TCP 22 (SSH)
- If OS Analysis is used, port TCP 8443 (HTTPS) for agents communication
Azure
- An active Microsoft Azure cloud account is required to deploy Runecast Analyzer.
- Deployment requires the following resources (customers can reuse existing resources):
- Azure Active Directory
- Active subscription
- Virtual Network
- Subnet
- Public IP for accessing over internet
- Network Security Group with the following incoming communication allowed:
- TCP 443 (HTTPS) for accessing the web interface and TCP 22 (SSH) for the remote management
- If OS Analysis is used, port TCP 8443 (HTTPS) for agents communication
Runecast is an HPE Technology Partner, and Runecast Analyzer is validated for deployment on HPE Ezmeral Container Platform. To find more about Runecast Analyzer on HPE Ezmeral please see the HPE Ezmeral Marketplace page https://www.hpe.com/us/en/software/marketplace/runecast.html. |
Analyzed System Privileges
VMware vCenter Server
A user with the following privilege at the vCenter level is required to connect to a VMware vCenter Server:
Minimum requirement
- Read Only
Note
The minimum required permission for the Analyzer to perform scanning is Read Only. However, in this case, collection will not be fully comprehensive and it will not be possible to report issues related to some areas of the configuration, such as device-specific info from ESXi hosts (driver, firmware). This is due to the way specific data is exposed through the vSphere permissions model.
To provide a fully comprehensive analysis, the additional privileges provided below will ensure that sufficient information is collected for 100% of the checks performed by Runecast Analyzer.
Recommended
| vCenter privilege | Description |
|---|---|
| Host > CIM > CIM interaction | CIM collection |
| Global > Settings | vSAN configuration collection |
| Host > Configuration > Firmware | Host files collection |
| Host > Configuration > Change settings | Kernel modules collection |
| Host > Configuration > Advanced settings Host > Configuration > Change settings Host > Configuration > Security profile and firewall |
Automatic ESXi Syslog configuration |
| Virtual Machine > Change Configuration > Advanced Configuration | Automatic VM Syslog configuration |
| Extension > Register extension Extension > Update extension |
Automatic Web Client registration |
| Host profile > View Host profile > Edit |
Automatic Host Profile collection |
| Host > Configuration > Change settings Global > Settings |
HW Compatibility |
Tip
A PowerCLI script to automatically create Runecast Role with the above permissions is available at https://github.com/Runecast/public/blob/master/PowerCLI/createRunecastRole.ps1.
Note
For a complete evaluation of security profiles such as NIST, DISA STIG for vSphere 7, vSphere 8, or VMware Security Configuration and Hardening Guide, please ensure that the service account used by Runecast Analyzer to connect to the vCenter Server is a member of the SystemConfiguration.SupportUsers and SystemConfiguration.BashShellAdministrators SSO groups. This will allow a limited log bundle and SSH collection which enables automatic evaluation of additional vCenter Server rules. For user's convenience, if SSH is disabled Runecast will attempt to temporary enable it for the duration of the data collection and then again disable it.
VMware NSX-V
NSX-V is supported by connecting to an NSX-V Manager when paired with a vCenter instance. Runecast Analyzer supports NSX-V Manager v6.2 and above.
For connection to NSX-V, a user with the following privileges in NSX Manager is needed:
Minimum requirement
- Auditor
Recommended
- Security administrator – required to leverage the NSX-V Custom Dashboard Widget for Runecast.
Note
Due to NSX-V Manager’s constraints before v6.3.3, Runecast Analyzer cannot automatically validate that an NSX-V Manager is registered to a specific vCenter. You will be asked to confirm during the connection process.
Authentication source
Domain
Domain users are supported on NSX-V 6.4 and later.
Local
Local CLI user can be created following the below procedure:
- Open console session to NSX-V Manager and log in with the Administrator account
- Switch to Privilege mode using the
enablecommand - Switch to Configuration mode using the
configure terminalcommand -
Add a CLI user account using the
user <username> password (hash | plaintext) <password>commandExample:
user cliuser password plaintext abcd1234 -
Save the configuration with
write memorycommand - Allow the created CLI user to run the REST API calls using the
user
<username> privilege web-interface
command - Issue POST request to
https://<NSX-IP>/api/2.0/services/usermgmt/role/<username>?isCli=trueendpoint with user having administrator privileges to assign a role to the newly created CLI user. Example of the body content assigning auditor privilege:<accessControlEntry> <role>auditor</role> <resource> <resourceId>globalroot-0</resourceId> </resource> </accessControlEntry> - Now you'll be able to use the new CLI user for connection to NSX-V Manager
VMware NSX-T
VMware NSX-T Data Center is supported by connecting to an NSX-T Manager, NSX-T Global Manager or its Cluster Virtual IP. Runecast Analyzer supports NSX-T version 2.4 and above.
For connection to NSX-T, a user with the following privileges in NSX-T Manager is needed:
Minimum requirement
- Auditor
VMware Horizon
VMware Horizon is supported by connecting to a Connection Server. For Connection Servers that are part of a single replication group, it is required to establish the connection to only one Connection Server which belongs to the group. Also, if there is a Load Balancer configured with session persistence, it can be used to connect to a Connection Server in a replication group. Runecast Analyzer supports Horizon v6.x and above.
For connection to a Connection Server, a user with the following privileges in Horizon is needed:
Minimum Requirement
- Administrators (Read-only).
VMware Cloud Director
VMware Cloud Director is supported by connecting to the provider portal. Runecast Analyzer supports VMware Cloud Director version 10.0 and above.
For connection to VMware Cloud Director, a user with the following privileges on the vCD provider level is needed:
Minimum Requirement
- A role with View-only permissions.
AWS
Amazon Web Services is supported by connecting to an AWS Account with access key or role-based authentication.
Access key authentication
For connection to an AWS Account using access key, we recommend using an account with Programmatic access only. To limit the operational overhead, we suggest using the AWS managed ReadOnlyAccess policy. This will cover future functionality and analysis capability provided by Analyzer, without the need to adjust the policy very often.
Role-based authentication
Info
IAM role-based authentication is supported only when deploying Runecast Analyzer via AWS Marketplace
It's also possible to use IAM role-based authentication to connect to AWS account. Follow the steps described in the AWS connection dialog to properly configure it.
Microsoft Azure
Azure AD is supported by connecting an Azure Application. To create the Azure Application and assign the required permissions, please follow these steps:
- Login to the Azure Portal
- Navigate to Azure Active Directory
-
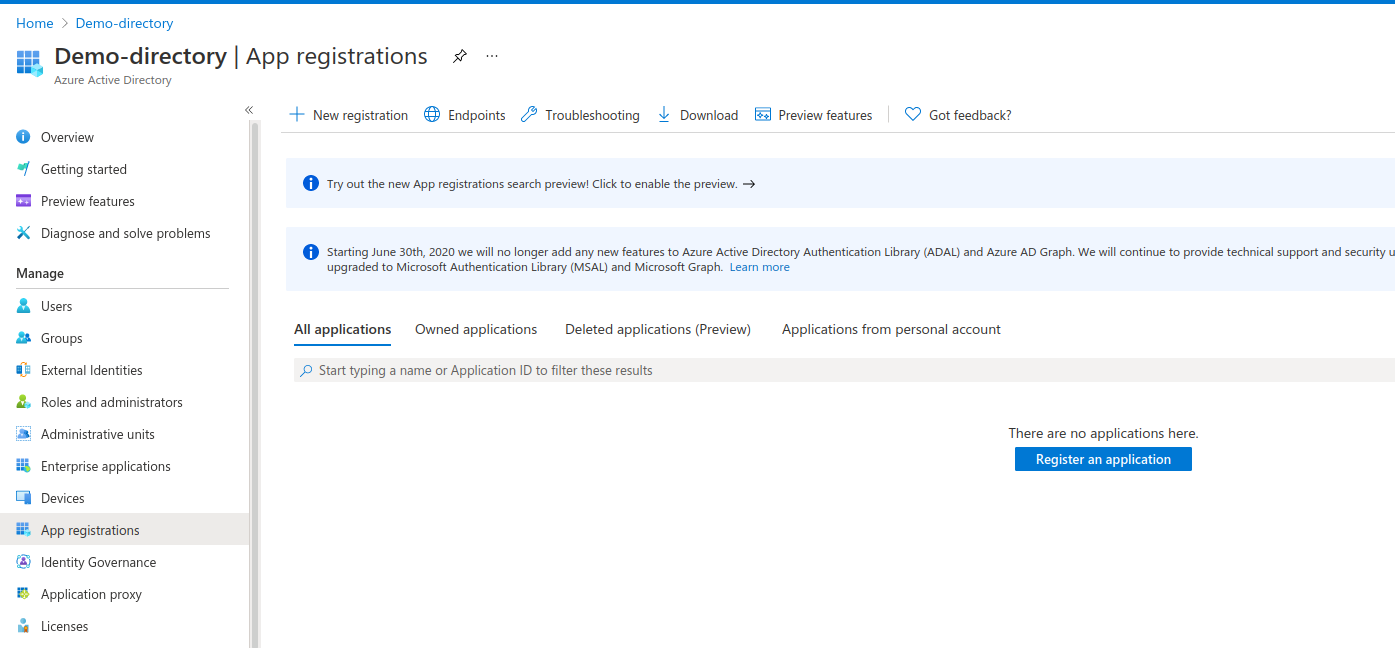
From the left side menu, click on App registrations then click on New Registration
-
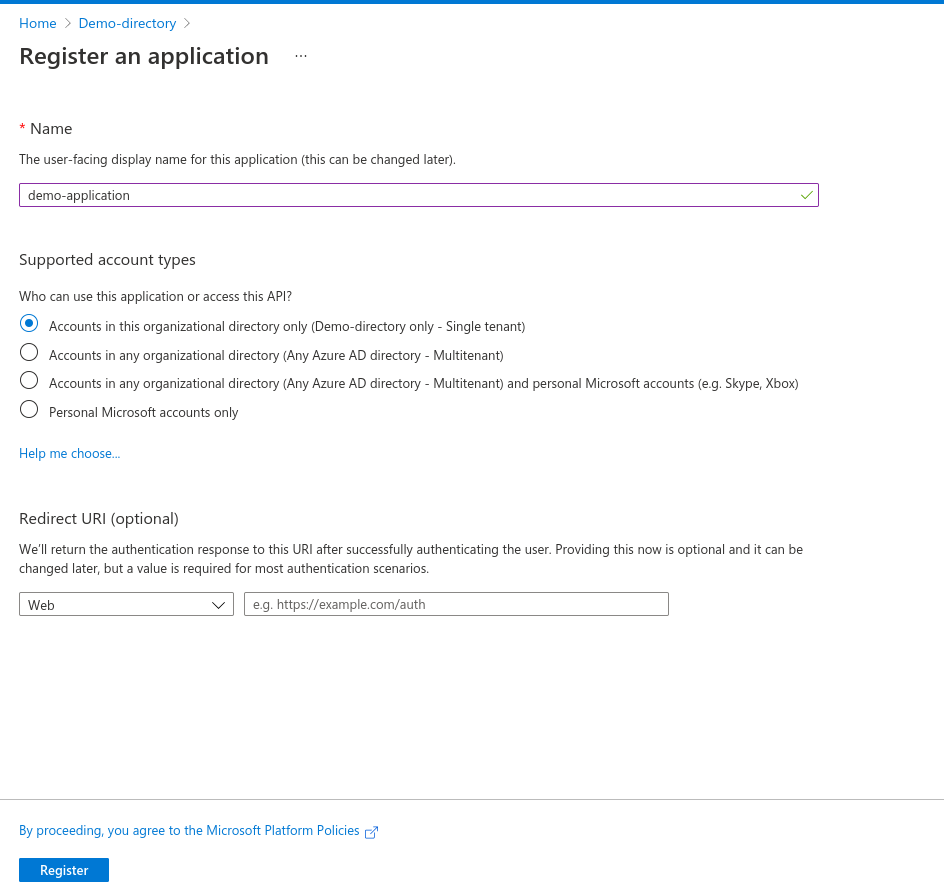
Provide a name for the application and select Accounts in this organizational directory only (Demo-directory only - Single tenant). Leave Redirect URI empty
-
Once the application is created, make a note of the Application (client) ID and Directory (tenant) ID shown in the application Overview page
-
Click on Certificates & secrets under Manage in the left side menu of the app
-
Under the Client secrets section, click on New client secret

-
Provide a suitable description for the client secret and select the expiration as per your organization policy. We recommend 1 year expiry for client secrets
- Make a note of the newly created client secret value
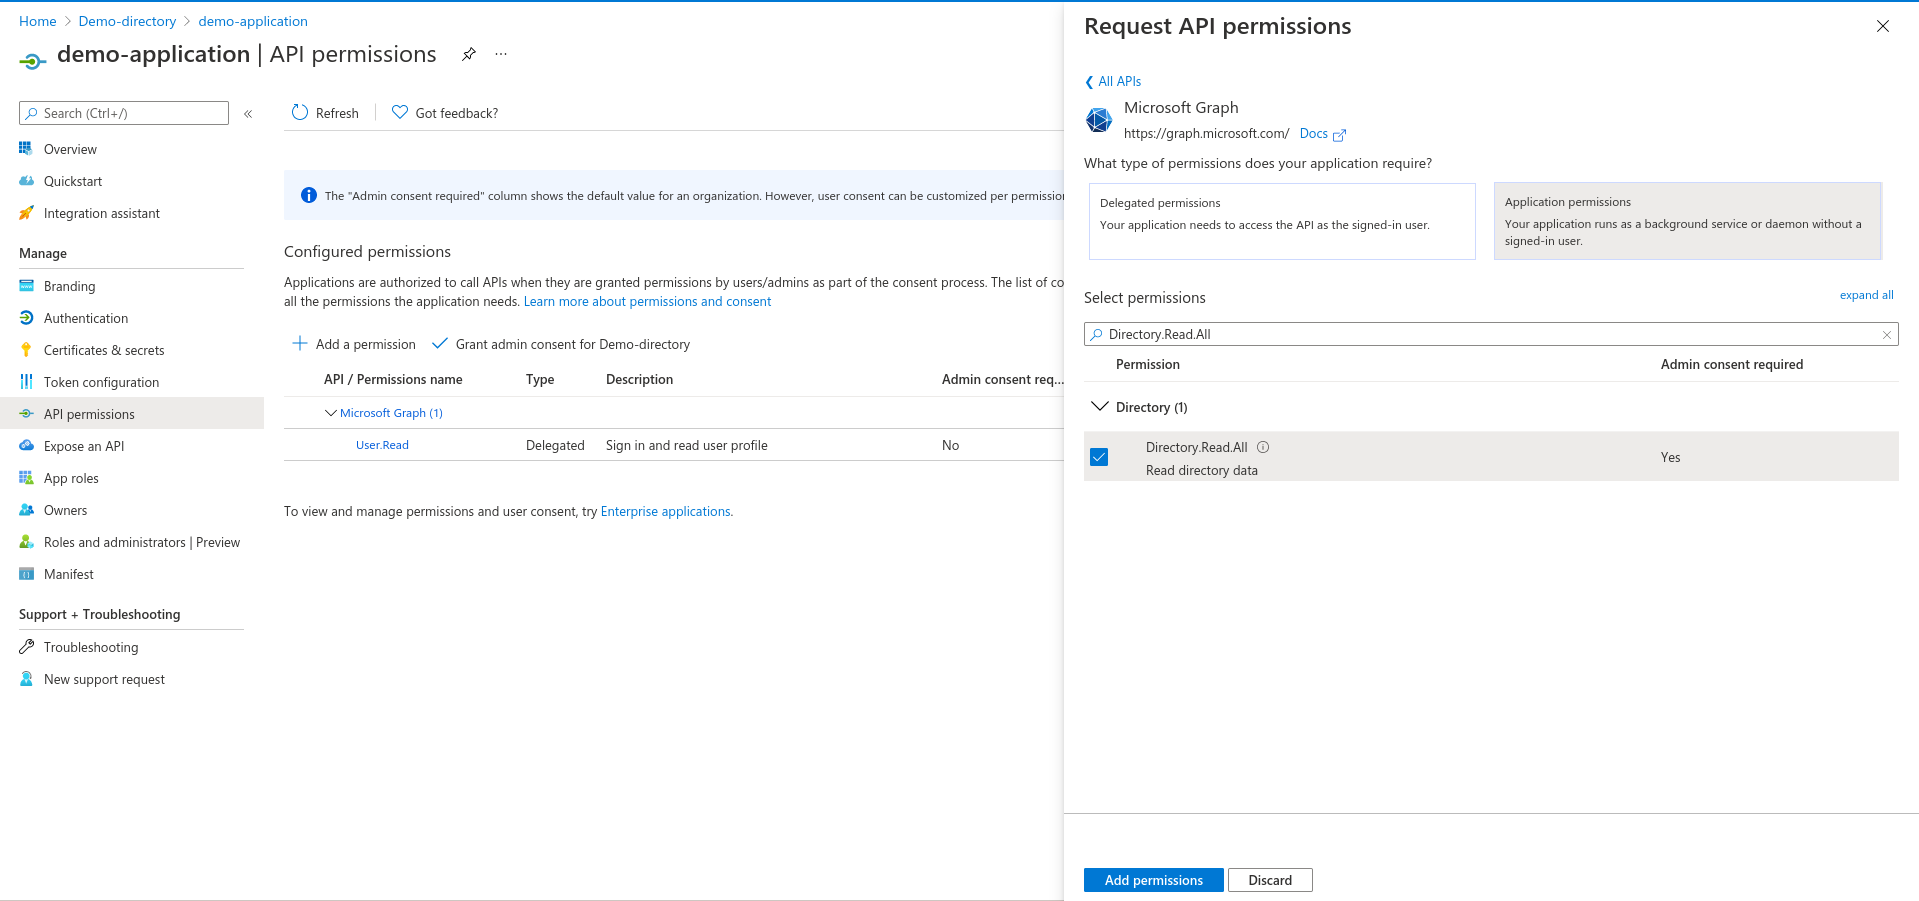
- Click on the API permissions under Manage in the left side menu of the App
-
Under Configured permissions section, add following Application permissions:
- Directory.Read.All
- UserAuthenticationMethod.Read.All
- RoleManagement.Read.Directory
- Policy.Read.All
- User.Read.All
from Graph API and click on Grant Admin Consent for Demo-directory
If you do not have admin privileges, please refer to the below link.
https://docs.microsoft.com/en-us/azure/active-directory/manage-apps/configure-user-consent?tabs=azure-portalWith the help of your administrator, you can change User consent settings.
-
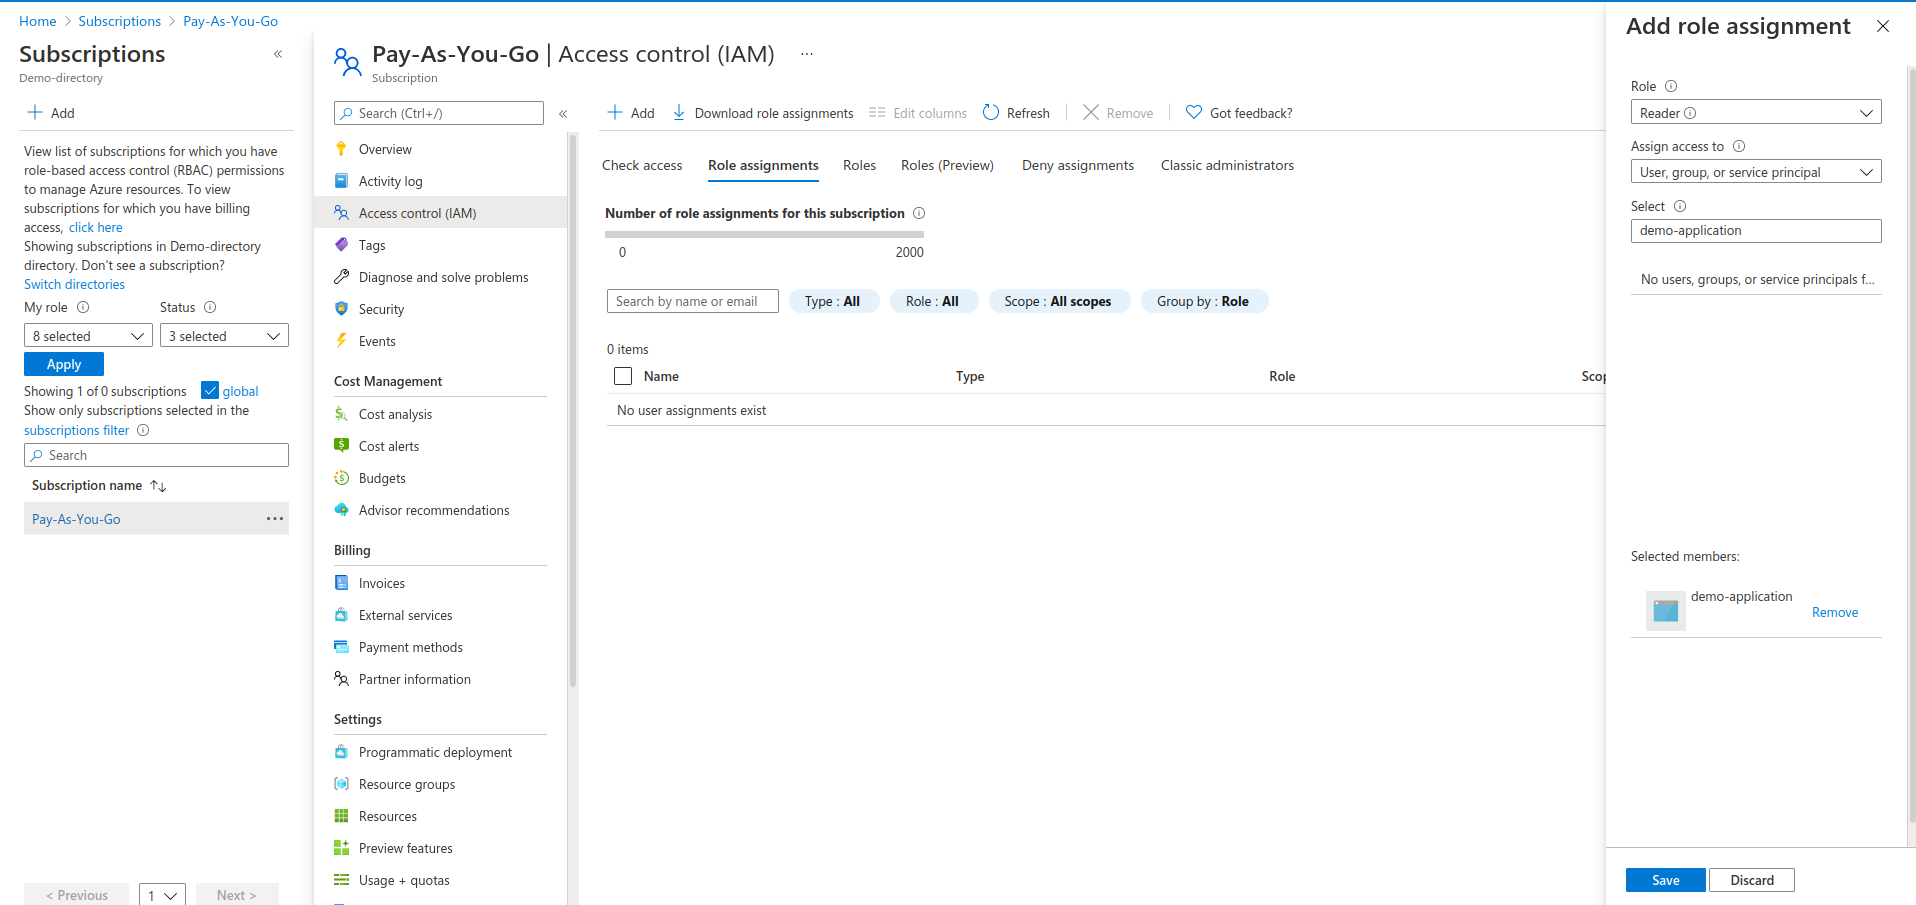
Navigate to the Subscriptions page and select the subscription for which you want to scan from Runecast Analyzer
- From the left side menu of subscription, click on Access control (IAM) and select Role assignments then click on Add and select Add role assignment
-
Select Reader as a role and set Assign access to to option User, group, or service principal. Under Select provide the name of your app created in step 5 and click on Save
GCP
Create a GCP Service Account with access assigned on organization level. To limit the operational overhead, we suggest using the predefined GCP roles as seen below.
To configure the Service Account, you will need to be member of the Organization Administrator role.
- Navigate to IAM & Admin > IAM in the GCP Console.
- Select a project, which belongs to an organization from the top bar.
- Click on Service accounts in the left sidebar.
- Click the + Create Service Account button:
- Name the service account
- Optionally, provide a description
- Click Create and Continue
- Select the organization from the top bar.
-
Assign Roles to the Service Account:
- Click Select a role
- Assign the following roles:
- Viewer Role
- Folder Viewer
- Firebase Viewer
- Organization Role Viewer
- Click Continue
-
Generate a JSON Keyfile:
- Click on Service accounts in the left sidebar
- Find and click on the service account
- In Service account details, click on Keys > Add Key > Create new key
- Select JSON and click Create
Note
Save the JSON keyfile immediately as it cannot be downloaded again
Note
In case you want to omit certain projects / folders from being analyzed you can create a deny policy.
-
In order to create, updated, and delete deny policies you need to have the Deny Admin role.
- Create a Deny Policy .json File, see example below:
{ "displayName": "My deny policy.", "rules": [ { "denyRule": { "deniedPrincipals": [ "principal://goog/subject/adri1.test@test.com" ], "deniedPermissions": [ "cloudresourcemanager.googleapis.com/projects.get" ] } } ] } -
Run the following gcloud command to apply the deny policy:
gcloud beta iam policies create <name of your deny policy> \
--attachment-point=cloudresourcemanager.googleapis.com/projects/<PROJECT ID> \
--kind=denypolicies \
--policy-file= <Name of your file that has the deny rules and principals; must be a .json file>
You can configure the policy in JSON format directly in the Google Cloud Deny policy page.
This will cover the analysis capability provided by Runecast Analyzer and also future functionality without the need to adjust the permissions often.
Kubernetes
Kubernetes data is collected:
- By connecting to the API server address using a service account token authentication. The connection to the API can be done via a load balancer address or directly to one of the master nodes.
- From a DaemonSet-deployed Runecast Node Collector. During K8s analysis, Runecast uses the above-mentioned API connection to create a temporary DaemonSet in a user-defined namespace (by default
runecast). Once the collection is complete, the pods will send the collected information to a callback address and the DaemonSet is removed. Both the namespace and the callback address can be configured in the connection settings. The pods need root privileges and use the hostPID to gather all the required node configuration information (like kubelet parameters, file permissions, etc.). The container image for the DaemonSet will be fetched from AWS public container registry (public.ecr.aws).
Info
Runecast Analyzer follows an extended version of the Kubernetes lifecycle policy, testing and validating against the current Kubernetes release, as well as the three previous releases. Managed Kubernetes environments, including Amazon EKS, Microsoft AKS, Google GKE, and HPE Ezmeral Container Platform are supported. However, as these services may limit access to the control plane, Runecast Analyzer cannot provide results for the control plane (as such, results in these environments are for the customer deployed clusters or workloads only).
To get the service account token, you need to create a service account first. The service account needs to have appropriate permissions to perform all the collection tasks. We provide you with a script to make the settings easy, please see below.
List of required permissions
API collection requirements
| cluster role option | cluster role option values |
|---|---|
| verbs | getlistwatch |
| resources | nodesnamespaces pods replicationcontrollers serviceaccounts services daemonsets.apps deployments.apps replicasets.apps statefulsets.apps cronjobs.batch jobs.batch networkpolicies.networking.k8s.io podsecuritypolicies.policy clusterrolebindings.rbac.authorization.k8s.io clusterroles.rbac.authorization.k8s.io rolebindings.rbac.authorization.k8s.io roles.rbac.authorization.k8s.io |
Node collection requirements
| role option | role option values |
|---|---|
| verbs | createupdatepatchdelete |
| resources | daemonsets.apps |
To obtain the API address, port, and service account token, from the management workstation where K8s command-line access is configured, follow the next steps:
-
Switch to the context of the cluster you are going to connect to in Runecast Analyzer:
kubectl config use-context <context name>Tip
In VMware Tanzu, use
kubectl vsphere login --server=<KUBERNETES-CONTROL-PLANE-IP-ADDRESS> --vsphere-username <VCENTER-SSO-USER>to log in to the cluster and then the above-mentioned command to switch to the context of the required workload cluster. To find out more information about connecting to Tanzu Kubernetes Cluster, please see the official documentation. -
Issue the following commands to find out the API address and port:
CURRENT_CONTEXT=$(kubectl config view -o jsonpath="{.current-context}") CURRENT_CLUSTER=$(kubectl config view -o jsonpath="{.contexts[?(@.name=='$CURRENT_CONTEXT')].context.cluster}") echo $(kubectl config view -o jsonpath="{.clusters[?(@.name=='$CURRENT_CLUSTER')].cluster.server}")$CURRENT_CONTEXT=(kubectl config view -o jsonpath="{.current-context}") $CURRENT_CLUSTER=(kubectl config view -o jsonpath="{.contexts[?(@.name=='$CURRENT_CONTEXT')].context.cluster}") Write-Host (kubectl config view -o jsonpath="{.clusters[?(@.name=='$CURRENT_CLUSTER')].cluster.server}") -
Create a service account with the appropriate permissions and read its token.
Note
Please note that since K8s 1.24 the service account token is not created automatically and the steps for K8s 1.24 and above slightly differ.
You can use the following commands to perform the task:
# set the namespace where the service account will be created
NAMESPACE='runecast'

# create the namespace and the service account
kubectl create namespace ${NAMESPACE}
kubectl create serviceaccount runecast-scan -n ${NAMESPACE}

# create the clusterrole (API collection)
kubectl create clusterrole runecast-api-collection --verb=get,list,watch --resource=nodes,namespaces,pods,replicationcontrollers,serviceaccounts,services,daemonsets.apps,deployments.apps,replicasets.apps,statefulsets.apps,cronjobs.batch,jobs.batch,networkpolicies.networking.k8s.io,podsecuritypolicies.policy,clusterrolebindings.rbac.authorization.k8s.io,clusterroles.rbac.authorization.k8s.io,rolebindings.rbac.authorization.k8s.io,roles.rbac.authorization.k8s.io

# bind the clusterrole (API collection)
kubectl create clusterrolebinding runecast-api-collection --clusterrole=runecast-api-collection --serviceaccount=${NAMESPACE}:runecast-scan

# create the role (node collection)
kubectl create role runecast-node-collection -n ${NAMESPACE} --verb=create,update,patch,delete --resource=daemonsets.apps

# bind the role (node collection)
kubectl create rolebinding runecast-node-collection -n ${NAMESPACE} --role=runecast-node-collection --serviceaccount=${NAMESPACE}:runecast-scan

# output the service account token
kubectl get serviceaccounts runecast-scan -n ${NAMESPACE} -o jsonpath='{.secrets[].name}' | xargs kubectl get secret -n ${NAMESPACE} -o jsonpath='{.data.token}' | base64 -d | awk '{print $1}'
# set the namespace where the service account will be created $namespace = 'runecast' # create the namespace and the service account kubectl create namespace $namespace kubectl create serviceaccount runecast-scan -n $namespace # create the clusterrole (API collection) kubectl create clusterrole runecast-scan --verb=get,list,watch --resource=nodes,namespaces,pods,replicationcontrollers,serviceaccounts,services,daemonsets.apps,deployments.apps,replicasets.apps,statefulsets.apps,cronjobs.batch,jobs.batch,networkpolicies.networking.k8s.io,podsecuritypolicies.policy,clusterrolebindings.rbac.authorization.k8s.io,clusterroles.rbac.authorization.k8s.io,rolebindings.rbac.authorization.k8s.io,roles.rbac.authorization.k8s.io # bind the clusterrole (API collection) kubectl create clusterrolebinding runecast-scan --clusterrole=runecast-scan --serviceaccount="$($namespace):runecast-scan" # create the role (node collection) kubectl create role runecast-node-collection -n $namespace --verb=create,update,patch,delete --resource=daemonsets.apps # bind the role (node collection) kubectl create rolebinding runecast-node-collection -n $namespace --role=runecast-node-collection --serviceaccount=${NAMESPACE}:runecast-scan # output the service account token $secretname = kubectl get serviceaccounts runecast-scan -n $namespace -o json | ConvertFrom-json | % { $_.secrets.name } $token = [System.Text.Encoding]::ASCII.GetString([System.Convert]::FromBase64String($(kubectl get secret $secretname -n $namespace -o json | ConvertFrom-Json | % { $_.data.token}))) $token | Set-Clipboard Write-Host "the service account token was copied to clipboard:`n$($token)`n"# set the namespace where the service account will be created and the token validity, 8760h = 1 year NAMESPACE='runecast' TOKEN_VALIDITY='8760h' # create the namespace and the service account kubectl create namespace ${NAMESPACE} kubectl create serviceaccount runecast-scan -n ${NAMESPACE} # create the clusterrole (API collection) kubectl create clusterrole runecast-api-collection --verb=get,list,watch --resource=nodes,namespaces,pods,replicationcontrollers,serviceaccounts,services,daemonsets.apps,deployments.apps,replicasets.apps,statefulsets.apps,cronjobs.batch,jobs.batch,networkpolicies.networking.k8s.io,clusterrolebindings.rbac.authorization.k8s.io,clusterroles.rbac.authorization.k8s.io,rolebindings.rbac.authorization.k8s.io,roles.rbac.authorization.k8s.io # bind the clusterrole (API collection) kubectl create clusterrolebinding runecast-api-collection --clusterrole=runecast-api-collection --serviceaccount=${NAMESPACE}:runecast-scan # create the role (node collection) kubectl create role runecast-node-collection -n ${NAMESPACE} --verb=create,update,patch,delete --resource=daemonsets.apps # bind the role (node collection) kubectl create rolebinding runecast-node-collection -n ${NAMESPACE} --role=runecast-node-collection --serviceaccount=${NAMESPACE}:runecast-scan # create and output the service account token kubectl create token runecast-scan --duration=${TOKEN_VALIDITY} -n ${NAMESPACE}# set the namespace where the service account will be created and the token validity, 8760h = 1 year $namespace = 'runecast' $token_validity = '8760h' # create the namespace and the service account kubectl create namespace $namespace kubectl create serviceaccount runecast-scan -n $namespace # create the clusterrole (API collection) kubectl create clusterrole runecast-scan --verb=get,list,watch --resource=nodes,namespaces,pods,replicationcontrollers,serviceaccounts,services,daemonsets.apps,deployments.apps,replicasets.apps,statefulsets.apps,cronjobs.batch,jobs.batch,networkpolicies.networking.k8s.io,clusterrolebindings.rbac.authorization.k8s.io,clusterroles.rbac.authorization.k8s.io,rolebindings.rbac.authorization.k8s.io,roles.rbac.authorization.k8s.io # bind the clusterrole (API collection) kubectl create clusterrolebinding runecast-scan --clusterrole=runecast-scan --serviceaccount="$($namespace):runecast-scan" # create the role (node collection) kubectl create role runecast-node-collection -n $namespace --verb=create,update,patch,delete --resource=daemonsets.apps # bind the role (node collection) kubectl create rolebinding runecast-node-collection -n $namespace --role=runecast-node-collection --serviceaccount="$($namespace):runecast-scan" # create and output the service account token $token = kubectl create token runecast-scan --duration=$token_validity -n $namespace $token | Set-Clipboard Write-Host "the service account token was copied to clipboard:`n$($token)`n"
Operating Systems
Operating Systems (OS) Analysis consists of two components:
- OS analysis service running on Runecast Analyzer appliance,
- OS agents running on operating systems, collecting data and reporting to OS Analysis service.
Before activating OS Analysis in Runecast Analyzer:
- make sure you are running OVA with the size of medium or large to fulfill the performance needs. Please see the System Requirements chapter for more information.
- prepare a DNS hostname or FQDN record pointing to Runecast Analyzer, that will be used by the OS agents to communicate with the OS analysis service. Alternatively, you can use the Runecast Analyzer IP address.
- install mysql-server package from public Ubuntu repositories, by following steps:
- Enable SSH, as described in Advanced Configuration
- Login using SSH to Runecast VM
- Execute the script:
/opt/runecast/scripts/install_mysql.sh
After the OS analysis service is enabled, you will need to download the OS agent installation packages and deploy them to target operating systems. The packages are preconfigured to connect to the OS analysis service and contain a service certificate for trust verification and enrollment secret to allow the agent to register with the service.
To deploy OS agents:
- you will need administrative rights on the target computer to install agents,
- the agent is running under
SYSTEMaccount on Windows,rootaccount on Linux.
Note
Please refer to the OS agents chapter on the Deployment page for more information about OS agent deployment.
When the OS agent is started for the very first time, it tries to connect to the OS analysis service using a user-defined hostname or FQDN (provided when enabling the service), verifies the service certificate is trusted and performs the enrollment. After the OS agent is enrolled, it will periodically send a status message to the OS analysis service and will collect data on-demand.
Network connectivity
| Source | Destination | Protocol | Port | Description | Comment |
|---|---|---|---|---|---|
| RCA | vCenter | TCP | 443 | Collection of data using vSphere SDK (vCenter, ESXi, VMs configuration settings) | required for core product functionality |
| RCA | vCenter | TCP | 5480 | Collection of data using VCSA REST API | required for extended security rules evaluation (vSphere 7.0 U1 and later) |
| RCA | vCenter | TCP | 22 | Collection of data using SSH | required for extended security rules evaluation via SSH |
| RCA | ESXi | TCP | 443 | Collection of data from ESXi servers (file-level configuration settings) | required for file-level checks |
| RCA | ESXi | TCP | 5988, 5989 | CIM data collection from ESXi servers | required for CIM data |
| RCA | NSX Manager | TCP | 443 | Collection of data using NSX-v REST API (NSX configuration settings) | required for core product functionality (in case NSX-v functionality is required) |
| RCA | NSX-T Manager | TCP | 443 | Collection of data using NSX-T REST API (NSX-T configuration settings) | required for core product functionality (in case NSX-T functionality is required) |
| RCA | AWS | TCP | 443 | Collection of data using AWS REST API (AWS configuration settings) | required for core product functionality (where AWS functionality is required) |
| RCA | Azure | TCP | 443 | Collection of data using Azure REST API (Azure configuration settings) | required for core product functionality (where Azure functionality is required) |
| RCA | GCP | TCP | 443 | Collection of data using GCP REST API (GCP configuration settings) | required for core product functionality (where GCP functionality is required) |
| RCA | Horizon | TCP | 443 | Collection of data using Horizon API (Horizon configuration settings) | required for core product functionality (in case Horizon functionality is required) |
| RCA | Kubernetes API | TCP | 6443 | Collection of data using Kubernetes API (Kubernetes configuration settings) | required for core product functionality (in case Kubernetes functionality is required) |
| RCA | Container image repository (default: hub.docker.com) | TCP | 443 | Access to container images for scanning | required for core product functionality (in case container image scanning functionality is required) |
| RCA | Cloud Director | TCP | 443 | Collection of configuration data using vCD API | required for core product functionality (in case vCD functionality is required) |
| OS agents | RCA | TCP | 8443 | Collection of OS agents data | required for Operating Systems data collection |
| ESXi | RCA | UDP | 514 | Syslog data collection | required for log analysis |
| RCA | updates.runecast.com | TCP | 443 | Application and rules definition updates | required for online updates only |
| User browser | RCA | TCP | 80, 443 | RCA web interface | HTTP always redirects to HTTPS |
| vSphere Web Client | RCA | TCP | 443 | Web client plugin communication to RCA | required for displaying results in WebClient |
| REST API client | RCA | TCP | 443 | Runecast API client’s communication | required for REST API |
| Enterprise Console (EC) | RCA | TCP | 443 | Single pane of Glass to RCA communication | required for displaying results from multiple Analyzers |
| RCA | DC | TCP & UDP | 88 | RCA communication to DC | required for Kerberos authentication |
| RCA | LDAP | TCP | 389 | RCA communication to AD | required for connection to a DC on a regular LDAP port |
| RCA | LDAP SSL | TCP | 636 | RCA communication to AD | required for connection to a DC on a protected LDAPS port |
| RCA | DNS | TCP & UDP | 53 | RCA communication to DNS | required for core product functionality |
| RCA | NTP servers (default: ntp.ubuntu.com) | UDP | 123 | RCA time synchronization | Required to keep appliance time in sync |
| RCA | Dynatrace environment | TCP | 443 | RCA communication to DT | Required for ingesting compliance results to Dynatrace |