Deployment
VMware
Installation
-
Download the Runecast Analyzer OVA file from your profile on the Runecast portal https://portal.runecast.com/, and deploy from your download location.
-
Select a VM name and folder.
-
Select a Compute resource.
-
Accept the license agreement.
-
Select the deployment configuration size (small, medium or large). Please see the VMware vSphere deployment system requirements for additional information.
-
Select Storage and Network on your environment.
-
In Customize template, configure the Networking properties of the Runecast Analyzer appliance.
-
Review the settings and click Finish.
-
Power on the appliance. After the boot process has finished, you should see the appliance console displaying the URL of the application. When you open the console, you can access Runecast Console Interface, which can be used to change the settings of the appliance, like network configuration, update settings, or
rcadminpassword. We recommend changing thercadminpassword right after the deployment.
Discover the step-by-step process of installing Runecast on your VMware setup in this comprehensive tutorial: Install Runecast for VMware.
Info
In the deployment wizard, you might see the message:
The OVF package contains advanced configuration options, which might pose a security risk. Review the advanced configuration options below. Click next to accept the advanced configuration options.
We have included the Extra Configuration that makes sure the appliance is deployed with the most strict settings as possible. The warning message is shown whenever any advanced settings are part of an OVA deployment.
Update
The appliance update is part of the application. Please se the Update section of Settings page.
AWS
Installation
Deploy with CloudFormation template
- Log in to your AWS account and navigate to AWS Marketplace subscriptions
- Select your Runecast Analyzer subscription
- Go to the section Agreement, click on Actions, and then Launch CloudFormation stack
- A new tab will open with configuration details where you have to select CloudFormation Template as the Fulfillment option. You can also choose the software version and region. Confirm the form by clicking on Continue to Launch
- Choose action Launch CloudFormation and click on Launch
- A new tab with the CloudFormation stack will open with pre-filled template details. Click on Next
- Specify stack details:
Stack name- enter an identifier to find this stack from a list of stackspublicAccess- select true if you need your Runecast Analyzer instance to be publicly available via the internetsecurityGroupId- provide the security group ID for your Runecast Analyzer instance. Ensure the selected Security Group has these rules- TCP 443 (HTTPS) to open web interface
- TCP 22 (SSH) to connect over SSH (not required for normal operation)
- TCP 8443 (HTTPS) if OS Analysis is used
subnetId- provide the subnet ID into which Runecast Analyzer will be deployed
- Proceed to the next page to acknowledge the creation of IAM resources at the bottom of the page
- Click Next, review all the details of the CloudFormation stack, and click on Submit
- Wait until the CloudFormation stack is created
Deploy with EC2 console
Info
Runecast Analyzer deployed via EC2 console does not support Role-based authentication for AWS analysis.
- Log in to your AWS account and navigate to the Amazon EC2 Dashboard:
- Click on Launch Instance
- Search for Runecast Analyzer and select it on AWS Marketplace tab
- Choose one of instance types: depending on size of your AWS account(s)
- t3a.medium
- t3a.large
- t3a.xlarge
- Create a new keypair or select existing one
- Select Network and Subnet, which will let you connect to the instance
- Configure Security Group, allowing access using ports:
- TCP 443 (HTTPS) to open web interface
- TCP 22 (SSH) to connect over SSH (not required for normal operation)
- TCP 8443 (HTTPS) if OS Analysis is used
- Default Storage settings should work in most cases
- Launch the instance
Access Runecast Analyzer instance
When the EC2 instance starts, you can access its web interface: https://<EC2 instance public IPv4 address>
Info
Default credentials for the web interface:
- Username:
rcuser - Password:
<EC2 instance Id>
Update
The appliance update is part of the application. Please se the Update section of Settings page.
Azure
Installation
- Navigate to Microsoft Azure Portal
- Go to the Virtual machines service page
- Click on Create then click on Virtual Machine from drop down menu
- Provide details like Subscription, Resource group, Virtual machine name, Region, Authentication type, etc as per your organization practice
- Under Image, click on See all images button
- Search for Runecast Analyzer in Marketplace and select Runecast Analyzer image
- Choose a VM size appropriate to the scale of your environment. One of the suitable VM sizes:
- B2ms
- B4ms
- On the Next page, provide Disks details
- On the Networking page, select the existing or create a new Virtual network and Subnet. Based on your environment, you might want to create a Public IP to access the appliance from the internet. The image has a preconfigured NSG rule for port TCP 443. Ensure the port is open if you attach an existing NSG. If OS Analysis is used, additionally open port TCP 8443 for agents communication.
- Complete the remaining steps as per your organization practice and launch the virtual machine
- Provide details like your email id and mobile number before clicking Create button
-
Once the virtual machine is in Running state, you can connect to its web interface:
https://<VM instance public IPv4 address>/rc2If you have not assigned public IP, you can connect to the web interface using private IP 13. Default credentials for the web interface:
- Username:
rcuser - Password:
Runecast!
- Username:
Update
The appliance update is part of the application. Please see the Update section of Settings page.
OS agents
After Operating Systems (OS) Analysis is enabled in Runecast Analyzer, you need to deploy the OS agents to target operating systems.
While deploying manually to each of the operating systems is possible, it won't be much effective even with a small number of operating systems. Runecast recommends using an automated deployment where possible to establish a smooth path to the agent upgrade when needed in the future and prevent any unnecessary manual work.
In most companies, there will already be a solution in use like Ansible, Chef, Puppet or Microsoft SCCM, that helps to ease the task of deploying software to multiple computers. For those, that don't use such a solution yet, we provide two examples of how to perform automatic deployment on Linux with Ansible and on Windows with Active Directory group policy.
For virtualized deployments, there is also the possibility to include the OS agent installation in the VM template. When preparing the templates, make sure to stop the osquery service and remove the osquery database directory before shutting down the VM. The osquery database directory is located at:
/var/osquery/osquery.dbon LinuxProgram Files\osquery\osquery.dbon Windows.
Automated Deployment Examples
Deploying to Linux hosts with Ansible
Ansible uses SSH for target host access. The following example will use SSH keys authentication but it's possible to use password authentication too. Please see the Connection methods and details chapter in the Ansible documentation.
-
Download the Linux package from Settings > Connections > Install OS agents.
-
Place the package to a directory together with the following ansible playbook file:
runecast-install-osagent.yaml
# runecast-install-osagent.yaml
- name: Install Runecast OS agent
  hosts: all
  vars:
    package_name:
      Windows: runecast-osagent-windows-5.8.2.zip
      Linux: runecast-osagent-linux-5.8.2.tar.gz
  gather_facts: true
  tasks:
    - name: Copy and extract installation package (Linux)
      become: true
      when: ansible_system == 'Linux'
      ansible.builtin.unarchive:
        src: "{{ package_name['Linux'] }}"
        dest: /tmp/
        copy: yes
    - name: Create a temporary directory (Windows)
      when: ansible_os_family == 'Windows'
      ansible.windows.win_tempfile:
        state: directory
      register: win_temp
    - name: Copy installation package (Windows)
      when: ansible_os_family == 'Windows'
      ansible.windows.win_copy:
        src: "{{ package_name['Windows'] }}"
        dest: '{{ win_temp.path }}'
    - name: Extract installation package (Windows)
      when: ansible_os_family == 'Windows'
      community.windows.win_unzip:
        src: '{{ win_temp.path }}\{{ package_name["Windows"] }}'
        dest: '{{ win_temp.path }}'
        delete_archive: yes
    - name: Install and configure OS agent (Linux)
      when: ansible_system == 'Linux'
      become: true
      ansible.builtin.shell:
        cmd: /tmp/{{ package_name['Linux'].split('.tar.gz')[0] }}/install-osagent.sh
    - name: Install and configure OS agent (Windows)
      when: ansible_os_family == 'Windows'
      ansible.windows.win_shell: '{{ win_temp.path }}\{{ package_name["Windows"].split(".zip")[0] }}\install-osagent.ps1'
    - name: Cleanup (Linux)
      when: ansible_system == 'Linux'
      become: true
      ansible.builtin.file:
        path: /tmp/{{ package_name['Linux'].split('.tar.gz')[0] }}/
        state: absent
    - name: Cleanup (Windows)
      when: ansible_os_family == 'Windows'
      ansible.windows.win_file:
        path: '{{ win_temp.path }}'
        state: absent
If the downloaded package name differs from the value of
package_namevariable, please modify the variable accordingly. -
Run this Ansible command to install the OS agent to the list of Linux computers, you will be asked for the sudo password:
ansible-playbook --ask-become-pass -i host1,host2,host3 runecast-deploy-osquery-linux.yaml -
When the deployment finished, the computers will register to the OS analysis service and can be found in Runecast Analyzer under Connections > Registered OS agents > Show OS agents.
Deploying to Windows hosts with Active Directory
To deploy OS agents to computers that are members of Active Directory, the following steps need to be performed:
- download the package of Runecast OS agent for Windows
- create a Group Policy that will install the OS agent package on computer start
- link the GPO to Organizational Unit where the target computers reside and reboot the computers
Please see the detailed procedure below:
-
In Runecast Analyzer, download the Runecast OS agent for Windows from Settings > Connections > Install OS agents.
-
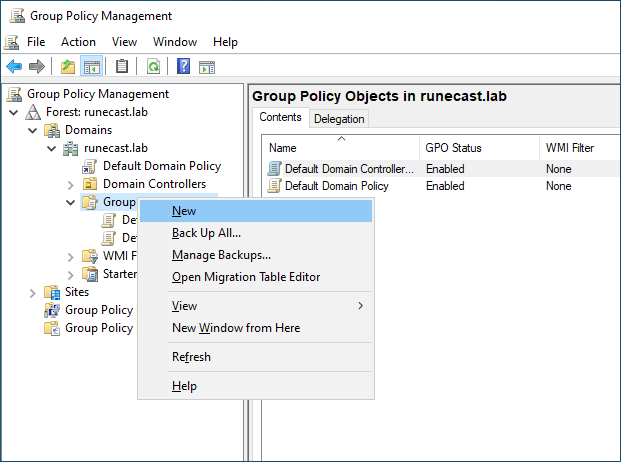
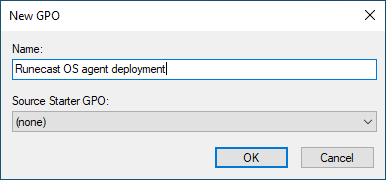
On a domain controller, run Group Policy Management console, navigate to Group Policy Objects and create a new GPO. The new Group Policy is named Runecast OS agent deployment in the example.
-
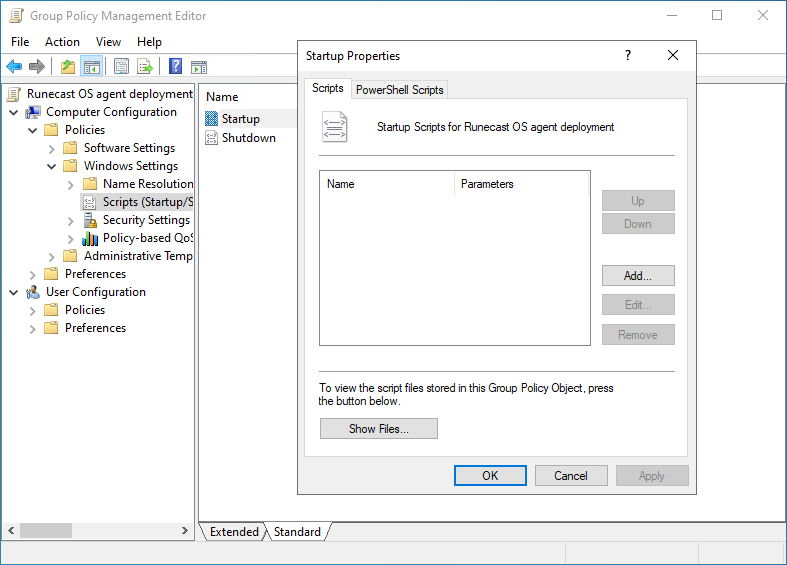
Edit the newly created GPO, navigate to Computer Configuration > Windows Settings > Scripts (Startup/Shutdown) and double-click startup.
-
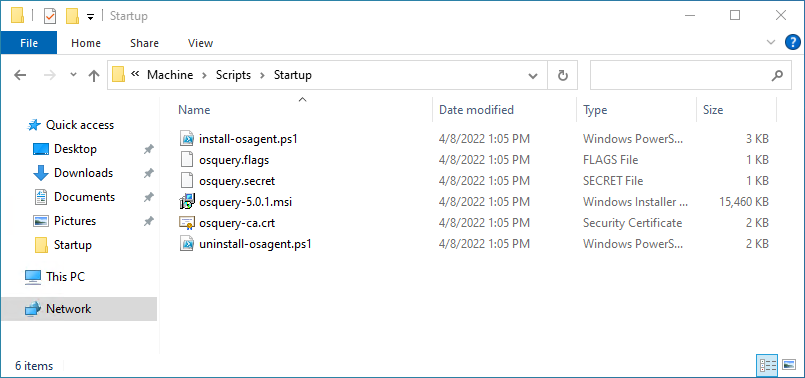
On the PowerShell Scripts tab click Show files. Copy and extract the downloaded OS agent archive and remove the archive file afterward.
Close the opened window.
-
Back in the Startup Properties window, click Add... > Browse..., select the
install-osagent.ps1script, click Open and click OK.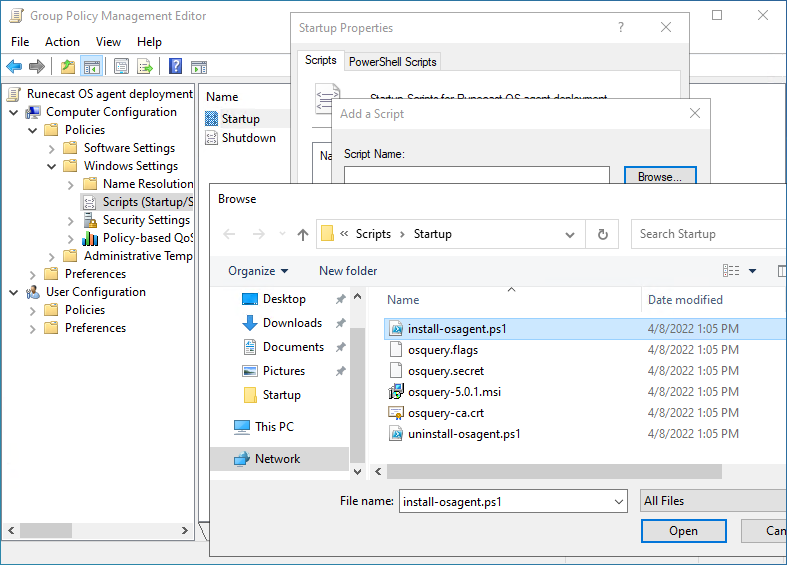
You should now see the script name in the Startup Scripts list:
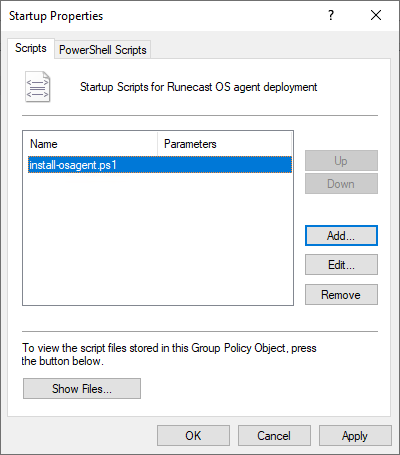
Close the Startup Properties with the OK button and close the GPO window as well.
-
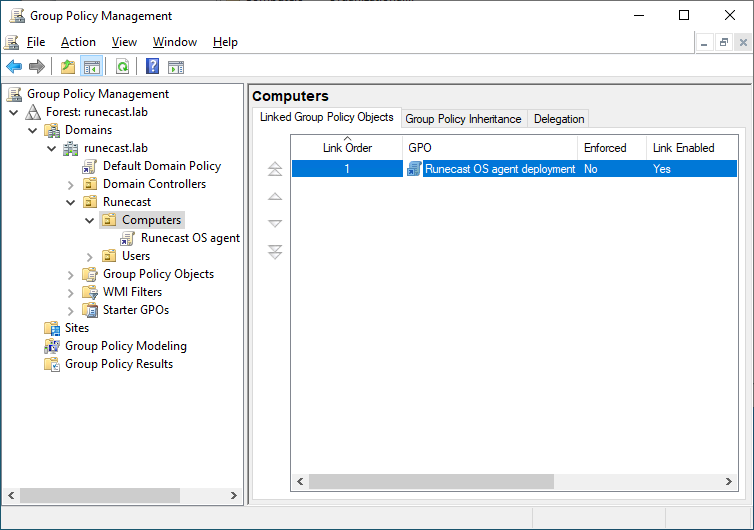
We have configured the GPO to deploy the OS agent when the computer starts. Now we need to link this GPO to an Organizational Unit where the target computers reside.
In the Group Policy Management console, find the OU, right-click and select Link an existing GPO.... Choose the GPO we just created (Runecast OS agent deployment in our case).
-
After you restart a Windows computer that resides in the OU where we linked the GPO, you can find the agent deployed and the computer registered to the OS analysis service. The computer can be found in Runecast Analyzer under Connections > Registered OS agents > Show OS agents.
Manual Deployment
If you would like to deploy the agents manually, please follow the steps for the desired operating system.
Microsoft Windows
-
Download the Runecast OS agent for Windows from Settings > Connections > Install OS agents.
-
Transfer and unzip the package on the target OS.
-
Start PowerShell with administrative rights and run the installation script with
./install-osagent.pslcommand. -
Verify the OS is present in Connections > Registered OS agents > Show OS agents.
Linux
-
Download the Runecast OS agent for Linux from Settings > Connections > Install OS agents.
-
Transfer the file to the target system and extract the archive with
tar -zxvf <package name>. -
From the extracted package directory, run
sudo ./install-osagent.sh. -
Verify the OS is present in Connections > Registered OS agents > Show OS agents.
Removal of agents
The OS agents can be removed from the operating systems similar way as they were deployed. The installation packages, that are downloaded from Runecast Analyzer, contain the uninstall scripts for the respective operating systems type:
-
Microsoft Windows:
uninstall-osagent.ps1 -
Linux:
uninstall-osagent.sh
An example playbook to uninstall the agent from multiple computers:
runecast-uninstall-osagent.yaml
# runecast-uninstall-osagent.yaml
- name: Uninstall Runecast OS agent
  hosts: all
  vars:
    package_name:
      Windows: runecast-osagent-windows-5.8.2.zip
      Linux: runecast-osagent-linux-5.8.2.tar.gz
  gather_facts: true
  tasks:
    - name: Copy and extract installation package (Linux)
      become: true
      when: ansible_system == 'Linux'
      ansible.builtin.unarchive:
        src: "{{ package_name['Linux'] }}"
        dest: /tmp/
        copy: yes
    - name: Create a temporary directory (Windows)
      when: ansible_os_family == 'Windows'
      ansible.windows.win_tempfile:
        state: directory
      register: win_temp
    - name: Copy installation package (Windows)
      when: ansible_os_family == 'Windows'
      ansible.windows.win_copy:
        src: "{{ package_name['Windows'] }}"
        dest: '{{ win_temp.path }}'
    - name: Extract installation package (Windows)
      when: ansible_os_family == 'Windows'
      community.windows.win_unzip:
        src: '{{ win_temp.path }}\{{ package_name["Windows"] }}'
        dest: '{{ win_temp.path }}'
        delete_archive: yes
    - name: Uninstall OS agent (Linux)
      when: ansible_system == 'Linux'
      become: true
      ansible.builtin.shell:
        cmd: /tmp/{{ package_name['Linux'].split('.tar.gz')[0] }}/uninstall-osagent.sh
    - name: Uninstall OS agent (Windows)
      when: ansible_os_family == 'Windows'
      ansible.windows.win_shell: '{{ win_temp.path }}\{{ package_name["Windows"].split(".zip")[0] }}\uninstall-osagent.ps1'
    - name: Cleanup (Linux)
      when: ansible_system == 'Linux'
      become: true
      ansible.builtin.file:
        path: /tmp/{{ package_name['Linux'].split('.tar.gz')[0] }}/
        state: absent
    - name: Cleanup (Windows)
      when: ansible_os_family == 'Windows'
      ansible.windows.win_file:
        path: '{{ win_temp.path }}'
        state: absent
After the agents are removed, you can remove the host entries from the OS analysis service in Runecast Analyzer. To remove the hosts, navigate to ** Settings > Connections > Operating Systems connections settings > Show details**.