Kubernetes Integration Examples
To configure Runecast as a Kubernetes validating admission webhook:
- generate a Global Admin Runecast API token
- configure the Kubernetes API server to use bearer token authentication on the Runecast API
- create a kubeconfig file with the credentials of the Runecast API
- create an admission configuration file pointing to the kubeconfig file
- place both files on the master node(s) making sure kube-apiserver will see the file
- in the the kube-apiserver manifest add the
--admission-control-config-fileparameter pointing to the admission configuration file
- create a validating webhook configuration using Runecast validating webhook API URL
Generate a Runecast API token
The Runecast validating webhook is part of the Runecast API and the requests need to be authenticated with a bearer token. Please follow the section API Access token to create the token with the access type Global Admin.
Configure webhook authentication on the Kubernetes API server
This section describes how to set up the control plane to authenticate to the Runecast API.
You will need:
- Runecast API token (created in the previous step)
- Runecast address and port that will be used by the Kubernetes API to call the validation webhook.
- For Runecast appliances or K8s deployed Runecast running on a different K8s cluster, this is simply the address used to access the appliance (for example
runecast.domain.local, if the port is 443 it can be omitted). - For K8s deployed Runecast running on the same cluster where you are configuring the admission, this will be the address of the
runecast-nginxservice which is by defaultrunecast-nginx.runecast.svc:9080.
- For Runecast appliances or K8s deployed Runecast running on a different K8s cluster, this is simply the address used to access the appliance (for example
The configuration is performed on the node(s) hosting the Kubernetes control plane. If you are running multiple nodes, you need to perform the configuration on all of them.
-
Locate the directory where will you store the authentication configuration files
You will need a directory to store two configuration files, kubeconfig file and admission configuration file, that will be accessed by the kube-apiserver. You can store the files in one of the directories that are already accessible by kube-apiserver by default, but we recommend creating a separate directory that might be used to store additional files, like auditing configuration.
sudo mkdir /etc/kubernetes/config -
Create the kubeconfig file that contains the authentication token:
RUNECAST_TOKEN="2645cda9-ac05-4b6d-8e94-f27c84e93377" RUNECAST_ADDRESS="runecast-nginx.runecast.svc:9080" echo | cat | sudo tee /etc/kubernetes/config/runecast-validating-webhook-kubeconfig.yaml > /dev/null << EOF apiVersion: v1 kind: Config users: - name: '${RUNECAST_ADDRESS}' user: token: '${RUNECAST_TOKEN}' EOF -
Create the admission configuration file that makes sure the admission controller is able to authenticate using the provided kubeconfig file:
echo | cat | sudo tee /etc/kubernetes/config/runecast-admission-configuration.yaml > /dev/null << EOF apiVersion: apiserver.config.k8s.io/v1 kind: AdmissionConfiguration plugins: - name: ValidatingAdmissionWebhook configuration: apiVersion: apiserver.config.k8s.io/v1 kind: WebhookAdmissionConfiguration kubeConfigFile: "/etc/kubernetes/config/runecast-validating-webhook-kubeconfig.yaml" EOF -
Modify the kube-apiserver manifest file to use the admission configuration file.
Warning
Please note that after changing and saving the kube-apiserver manifest file the kube-apiserver gets restarted. If any misconfiguration happens, the Kubernetes API server won't be available.
sudo nano /etc/kubernetes/manifests/kube-apiserver.yamlUnder
- kube-apiserverline located in.spec.containers.commandadd the parameter--admission-control-config-filepointing to the admission configuration filespec: containers: - command: - kube-apiserver - --admission-control-config-file=/etc/kubernetes/config/runecast-admission-configuration.yamlAdditionally, if you have created a new directory on the node to store the files, the path needs to be mapped to the kube-apiserver pod. In the manifest file, find the
.spec.volumessection and add a new mapping of the host directory to the pod:volumes: - hostPath: path: /etc/kubernetes/config type: DirectoryOrCreate name: etc-kubernetes-configUnder the
.spec.containers.volumeMountssection add a new setting to mount the above volume to the kube-apiserver container directory:volumeMounts: - mountPath: /etc/kubernetes/config name: etc-kubernetes-config readOnly: true -
Lastly, save the kube-apiserver manifest file and wait for the pod to become available. You can verify the new settings are in place with the following command:
Based on the settings made you should see a similar output:sudo kubectl -n kube-system get pods -l component=kube-apiserver -oyaml | grep 'admission-control-config-file'- --admission-control-config-file=/etc/kubernetes/config/runecast-admission-configuration.yaml
For more information about the webhook authentication settings, please see the official documentation
Create the validating webhook configuration
Once the authentication is configured on the control plane, you can create the admission webhook configuration.
The configuration tells the API server for which objects and operations to call a specific validating webhook. To select the objects, there are multiple options available. Please make sure you check the official documentation to see the possibilities and create a configuration that suits your use case.
apiVersion: admissionregistration.k8s.io/v1
kind: ValidatingWebhookConfiguration
...
webhooks:
- name: my-webhook.example.com
  rules:
  ...
  objectSelector:
  ...
  namespaceSelector:
  ...
  clientConfig:
  ...
- name: another-webhook.example.com
  ...
In this example, we select all workload resources that are being created or modified in the namespaces labeled runecast-admission-policy=2. For these operations we will call a Runecast API webhook with policy id /rc2/api/v2/k8s-admission-policy-review/policy/2.
First define the rule:
rules:
- apiGroups:   ["*"]
  apiVersions: ["v1"]
  operations:  ["CREATE","UPDATE"]
  resources:   ["pods","daemonsets","deployments","replicasets","statefulsets", "replicationcontrollers","cronjobs","jobs"]
  scope:       "Namespaced"
Next, define a namespaceSelector that makes sure that only objects in the specifically labeled namespaces are checked.
namespaceSelector:
  matchExpressions:
  - values:
    - '2'
    operator: In
    key: runecast-admission-policy
runecast-admission-policy=2 will match this rule.
If you would like to check all namespaces, be sure to use the namespaceSelector to exclude the system namespace kube-system.
Excluding kube-system
namespaceSelector:
  matchExpressions:
  - values:
    - kube-system
    operator: NotIn
    key: kubernetes.io/metadata.name
After selecting the objects define the webhook in the clientConfig field. Based on the type of Runecast deployment the definition differs:
- If Runecast is running outside of the configured cluster, you will use the
urldefinition. - If Runecast is running in the same K8s cluster, you will refer to Runecast in the
servicedefinition.
Additionally, Kubernetes API verifies the trust of the Runecast webhook certificate. If the certificate is not issued by a CA that is trusted by the control plane, you need to provide the base64 encoded certificate of the issuer in the caBundle field.
clientConfig:
  caBundle: LS0tLS1...
  url: https://runecast.domain.local/rc2/api/v2/k8s-admission-policy-review/policy/<policy id>
clientConfig:
  caBundle: LS0tLS1...
  service:
    namespace: <runecast namespace>
    name: <runecast nginx service name>
    path: /rc2/api/v2/k8s-admission-policy-review/policy/<policy id>
    port: <runecast service port>
Finally, you will apply the complete validating webhook configuration to the cluster. Below you can find two examples:
-
Runecast running outside of the K8s cluster and the Runecast certificate is trusted by the control plane
cat << EOF | kubectl apply -f - apiVersion: admissionregistration.k8s.io/v1 kind: ValidatingWebhookConfiguration metadata: name: "runecast-validating-webhook" webhooks: - name: "deny-fixed-critical-and-medium.runecast.com" rules: - apiGroups: ["*"] apiVersions: ["v1"] operations: ["CREATE","UPDATE"] resources: ["pods","daemonsets","deployments","replicasets","statefulsets", "replicationcontrollers","cronjobs","jobs"] scope: "Namespaced" namespaceSelector: matchExpressions: - values: - '2' operator: In key: runecast-admission-policy clientConfig: url: https://runecast.domain.local/rc2/api/v2/k8s-admission-policy-review/policy/2 admissionReviewVersions: ["v1", "v1beta1"] sideEffects: None EOF -
Runecast running in the K8s cluster and the Runecast certificate is not trusted by the control plane
RUNECAST_NAMESPACE='runecast'
RUNECAST_SERVICE=$(kubectl -n $RUNECAST_NAMESPACE get service -l app.kubernetes.io/name=nginx -o jsonpath='{.items[].metadata.name}')
RUNECAST_SERVICE_PORT=$(kubectl -n $RUNECAST_NAMESPACE get service -l app.kubernetes.io/name=nginx -ojsonpath={.items[].spec.ports[].port})
RUNECAST_SERVICE_CERTIFICATE=$(kubectl -n $RUNECAST_NAMESPACE get pod -l app.kubernetes.io/name=nginx -o jsonpath='{.items[].spec.volumes[?(@.name=="nginx-secret")].secret.secretName}' | xargs kubectl get secret -o jsonpath='{.data.tls\.crt}')

cat << EOF | kubectl apply -f -
apiVersion: admissionregistration.k8s.io/v1
kind: ValidatingWebhookConfiguration
metadata:
  name: "runecast-validating-webhook"
webhooks:
- name: "deny-fixed-critical-and-medium.runecast.com"
  rules:
  - apiGroups:   ["*"]
    apiVersions: ["v1"]
    operations:  ["CREATE","UPDATE"]
    resources:   ["pods","daemonsets","deployments","replicasets","statefulsets", "replicationcontrollers","cronjobs","jobs"]
    scope:       "Namespaced"
  namespaceSelector:
    matchExpressions:
    - values:
      - '2'
      operator: In
      key: runecast-admission-policy
  clientConfig:
    service:
      namespace: ${RUNECAST_NAMESPACE}
      name: ${RUNECAST_SERVICE}
      path: /rc2/api/v2/k8s-admission-policy-review/policy/2
      port: ${RUNECAST_SERVICE_PORT}
    caBundle: ${RUNECAST_SERVICE_CERTIFICATE}
  admissionReviewVersions: ["v1", "v1beta1"]
  sideEffects: None
EOF
Once the webhook configuration is applied to the cluster, you can immediately see it in action.
-
Create a namespace and label it accordingly:
kubectl create namespace runecast-test kubectl label namespace runecast-test runecast-admission-policy=2 -
Try to create a pod that is expected to have critical or high severity vulnerabilities that have a fix available (this is the policy set in the webhook):
The creation of the pod will be blocked and an error message displayed:kubectl -n runecast-test run nginx-1-19 --image=nginx:1.19Error from server: admission webhook "deny-fixed-critical-and-medium.image-scanning.runecast.com" denied the request: Image scan in Runecast Analyzer found policy violations: (Rejected by policy 2: 'No critical or high severity vulnerabilities with available fix'). -
Now try to create a pod that is expected to have no critical or high severity vulnerabilities that have a fix available:
The pod will be created:kubectl -n runecast-test run nginx-latest --image=nginx:latestpod/nginx-latest created
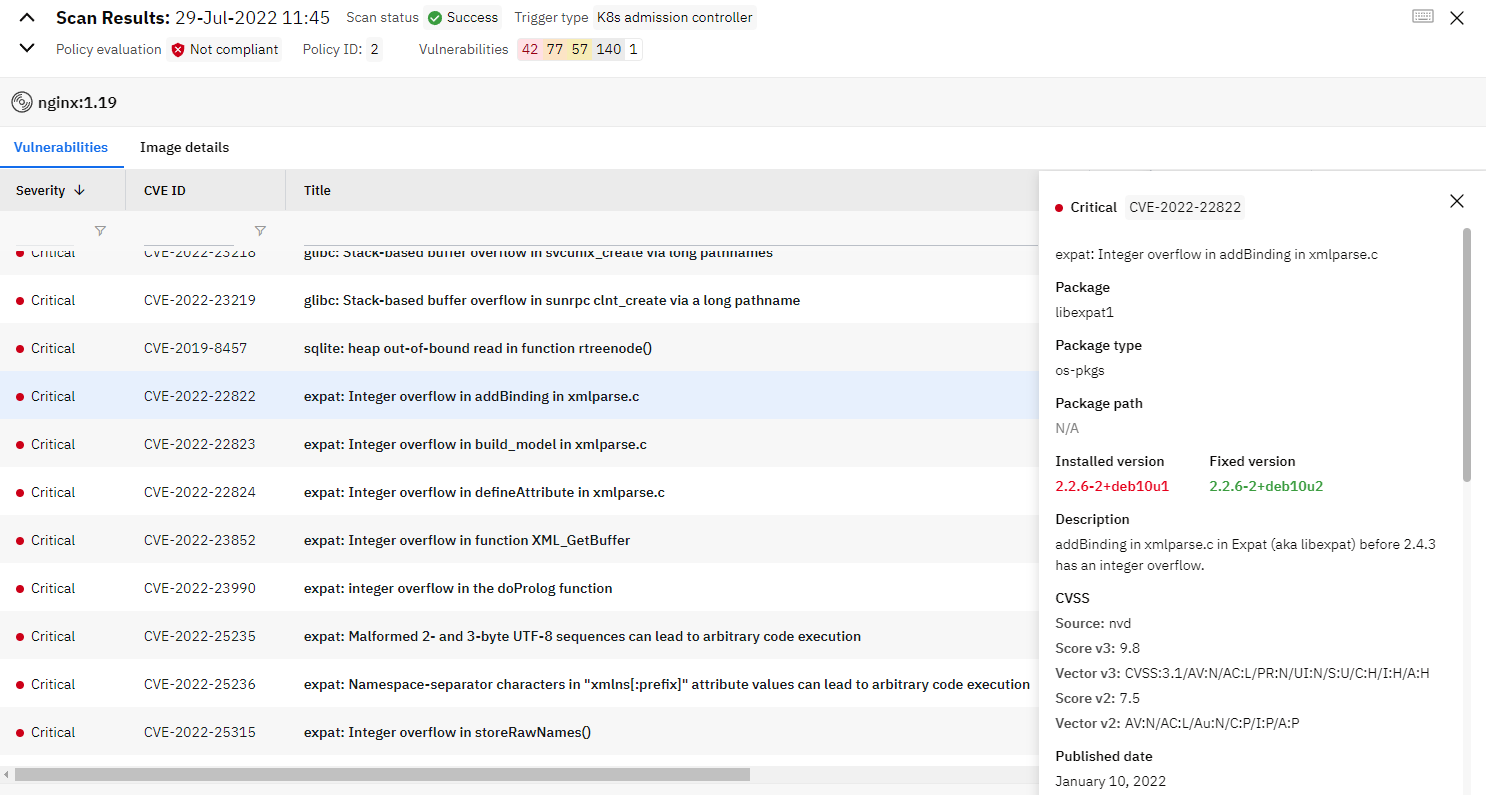
To find the details about the image scans please open Runecast and navigate to Image Scanning. You will find the result of each admission in the list indicated by Trigger type of K8s admission controller.

When you select a specific scan you will be presented with the scan results - evaluation result, policy ID, number of vulnerabilities and the list of the vulnerabilities.
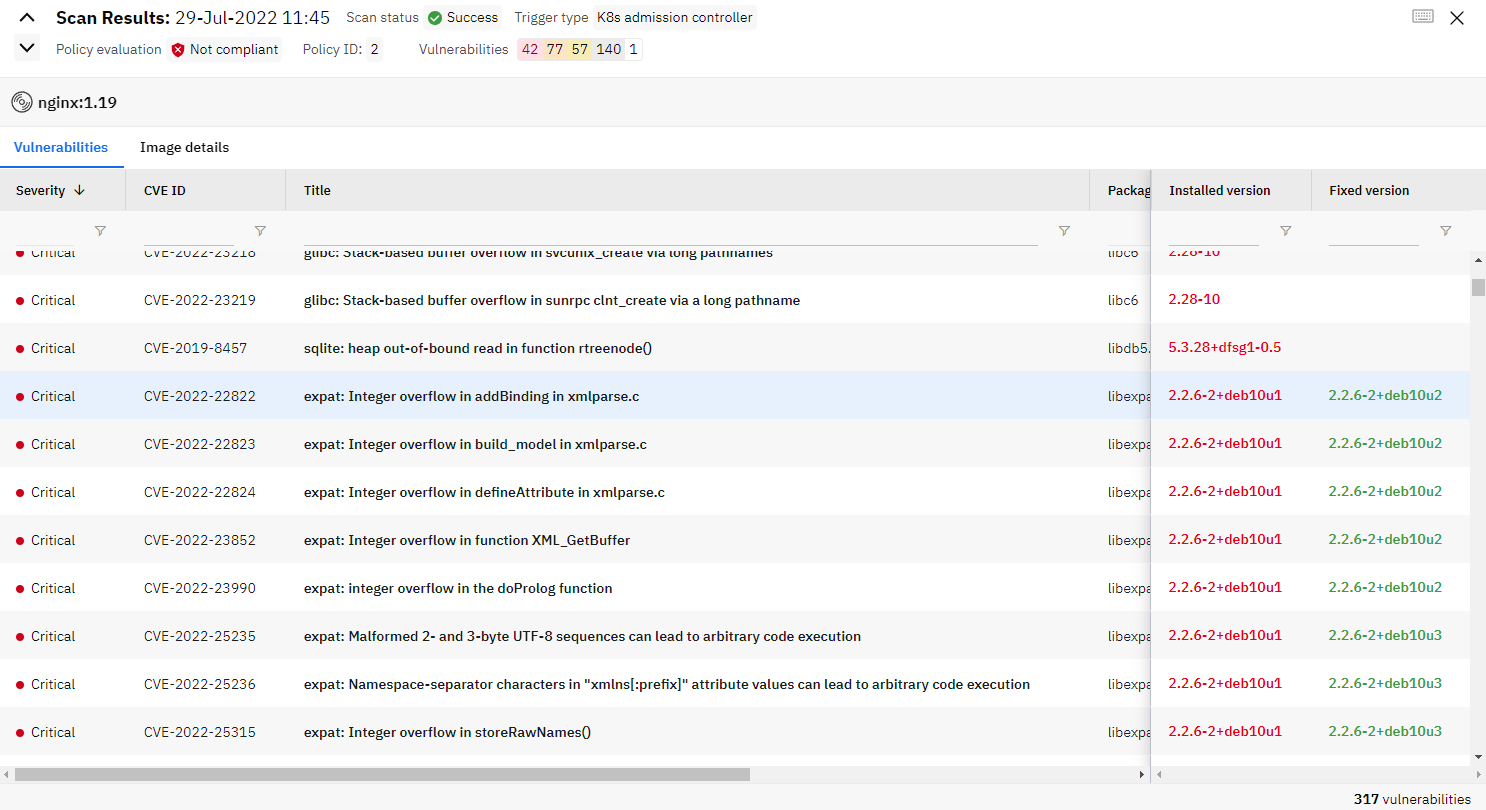
After clicking on a specific vulnerability, details are revealed.