Settings Page
The Runecast Analyzer settings icon (cog icon) is located on the right-hand side of the top navigation bar. Use this page to configure connections to the virtual infrastructure, scheduled analysis, alerting, logs, filters, licensing and Runecast appliance users.
Connections
Within the Connections tab, you can specify the connection details for vCenter servers (and optionally, NSX-V Managers), Horizon Connection Servers, NSX-T, VMware Cloud Director, AWS, Azure and Kubernetes details for the environment that Runecast will analyze. Server address, port number, username and password are mandatory fields as well as access and secret keys (if using AWS), directory and application id (if using Azure) or SA token (if using Kubernetes). The account you specify should have the minimum required permissions specified in System Requirements chapter of the user guide. To connect to multiple Systems, add them one by one. For more details please check Connect to a System and Analyze.
Automatic Scheduler
You can configure automatic scheduling by clicking the Edit button. Once automatic scanning is selected, the scanning frequency can be chosen. The Analyze now button can be used even when Automated scans are scheduled.
Alerting
The Alerting page can be used to enable e-mail alerting. After each analysis, either manual or automatic, an e-mail containing a report of findings will be sent to the configured recipient(s). SMTP server and port, as well as sender and recipient e-mail addresses are mandatory fields. Multiple recipient e-mail addresses separated by a comma can be added (For example: email1@domain1.com, email2@domain2.com, email3@domain3.com).
Log Analysis
The Log Analysis page can be used to configure log retention and syslog settings for VMware Hosts and VMs. For more information – see Configure Log Collection.
Use the Reload button, located on right-hand side of Syslog settings on the Hosts and VMs of configured vCenters to re-fetch the current configuration from all vCenters. A timestamp will indicate when the last fetch was triggered. Also, a re-fetch can be performed individually for each vCenter by clicking the specific  icon.
icon.
Knowledge Profiles
In this section you can choose which profiles to use for your environment's security compliance, you can enable additional best practices or even create your own custom profile.
-
Security compliance: By default, VMware Security Hardening Guide for vSphere is enabled and active. You can select additional profiles if you need to adhere to other security standards.
-
Best practices: Additional Best practices profiles can be enabled – SAP HANA for VMware, VMware on Nutanix, and Powershell.
-
Custom Profiles: By enabling Custom Profiles you can create your own profiles for audits and organize all necessary checks in one place.
User Management
The User Management tab can be used to manage the Local users accounts or to connect Runecast Analyzer to Active Directory or LDAP.
There are 4 predefined roles that can be assigned to grant access to Runecast Analyzer:
-
Global Admin - unlimited access to the Runecast Analyzer application, including any organizations created.
-
Global Read-only - read only access to the Runecast Analyzer application, including any organizations created.
-
Organization Admin - provides administrative access to the assgined organization. This includes actions like managing systems and performing configuration in the scope of the organization.
-
Organization Read-only - provides read only access to the assgined organization.
Local users
The default local user that has access to the Runecast Analyzer web interface is:
- Username:
rcuser - Password:
Runecast!
By default, rcuser is granted with Global Admin role which cannot be changed. Click Edit user (cog icon) in the Actions column to change the default password.
Note
rcuser is the only account which cannot be deleted.
An unlimited number of Local users accounts can be added. For each local user, one of two roles can be selected: Global Admin or Global Read-only.
Active Directory
You can use Active Directory accounts to login to the Runecast Analyzer web interface. Members of configured groups will have access with specified roles.
Enable the Active Directory by clicking of the dedicated button and provide the information about your Active Directory domain:
- Domain: name of the Active Directory domain, for example
company.com
Optionally, you can configure the Advanced options by enabling the Use SSL button:
-
URL: the address of a domain controller, for example
ldap://dc.company.comorldaps://dc.company.com -
Port: the LDAP service port number (by default
389for SSL disabled or636for SSL enabled) -
Root DN: specify the LDAP search base DN for users or groups, for example
OU=test,DC=company,DC=com. It might be useful in large domains to limit the number of search results.
Under Domain Groups, add the Active Directory groups which will have access to Runecast Analyzer. Any user, that is a member of this group in the specified domain, will get the assigned role to the Runecast Analyzer web interface.
When an AD user is a member of multiple groups granting different roles in Runecast Analyzer, the resulting privilege level will be set to highest one. If configured, organization assignment is taken into account to define the permissions scope.
Don't forget to Save once all the configurations are done.
Warning
Make sure that:
-
DNS is configured. Runecast Analyzer should be able to resolve the domain controller name.
-
The group you add under the Domain Groups exists in your Active Directory domain.
-
The user logging can read members of the group.
-
The time is synchronized with the domain, either from the host via VMware Tools or by setting up time synchronization inside the appliance.
Note
On the background, we use Kerberos authentication. The primary suffix of the user logging in has to match the Domain. When logging in, either use no suffix or use the primary suffix of the user.
LDAP
You can configure Runecast Analyzer to allow LDAP users to log in to the web interface. Based on the users' membership in configured groups, they will have access with the corresponding privileges.
To enable LDAP users to log in, switch on Enable LDAP and provide the configuration:
-
Domain name: enter the name of the LDAP domain, for example
company.com. -
Users root DN: enter the users LDAP search base, for example
OU=users, DC=company, DC=com. This will help shorten the login times in large LDAP trees. -
Groups root DN: enter the group LDAP search base, for example
OU=groups, DC=company, DC=com. -
User DN: enter the bind user distinguished name, for example
CN=bind_user, DC=company, DC=local. The user will be used for verifying the group membership and needs to have appropriate permissions. -
Password: enter the bind user password.
-
Use LDAPS: if you want to use a secure connection to LDAP server(s), click the checkbox and use the Upload certificate button to upload a CA certificate or certificate chain.
-
Primary server URL: enter the FQDN or IP address of the LDAP server.
-
Port: enter the LDAP service port (by default
389for LDAP and636for LDAPS). -
Optionally, enter the Secondary server URL and Port.
Under Domain Groups, click the Add Group button, fill-in an existing LDAP group name and choose the group role in the Role drop-down (Read-only or Admin). Click the Add Group button to confirm. You can repeat the procedure to insert additional groups.
When an LDAP user is a member of multiple groups granting different roles in Runecast Analyzer, the resulting privilege level will be set to highest one. If configured, organization assignment is taken into account to define the permissions scope.
Once all configuration is done, click the Save button.
OpenID Connect
It's possible to configure integration with OpenID Connect authentication provider to allow access to Runecast Analyzer using Single Sign-on.
Note
The functionality was validated with private authentication providers (i.e. Keycloak) and also AWS Cognito as a public provider.
For your convenience, you can find an example shell script for configuring AWS Congnito.
To allow users to log in via OpenID Connect, switch on Enable OpenID Connect login and provide the configuration:
- Issuer location: address of the authentication provider
- Client ID: ID of the client to be used for connection to the authentication provider
- Client secret: secret of the client to be used for connection to the authentication provider
- Custom login method name: a user friendly name of the authentication provider. It will be visible on the Runecast Analyzer login screen
- Additional scope (optional): additional user attributes to be retrieved
- Roles key: a property to be used for identifying the group membership of the users
- Name key (Optional): a property to be used for identifying the username of the users
Under Domain Groups, click the Add Group button, fill in an existing group name and choose the group role in the Role drop-down (Read-only or Admin). Click the Add Group button to confirm. You can repeat the procedure to insert additional groups.
Once all configuration is done, click the Save button.
Okta ID integration
This integration allows logging into Runecast Analyzer with your Okta ID through OpenID Connect.
Requirements:
-
Okta ID account
-
Defined groups in Okta
- Navigate to Directory > Groups
- Assign the account that you would like to use to log in to Runecast Analyzer to a new or an existing group
To set up the Okta-Runecast integration, take these steps in Okta:
-
Create a new application integration with the following parameters:
- Sign-in method: OIDC
- Application Type: Web Application
-
On the New Web App Integration page, set the values as follows:
- Grant type: select only
Authorization Code -
Sign-in redirect URIs: this will be composed of
- your RCA instance URL,
- the
/login/oauth2/codestring, and - the Okta authorization server (found under Security > API > Authorization servers)
Example:
https://10.5.253.184/rc2/login/oauth2/code/dev-12345678.okta.com -
Sign-out redirect URIs: URL of your RCA instance
- Controlled access: Limit access to selected groups
- Grant type: select only
-
Set up claims in Security > API > Edit API > Claims; by defining a claim with both ID and Access Claim types with the following parameters:
- Name:
groups - Value type: Groups
- Filter: Matches regex
.* - Include in: Any scope
- Name:
Log in to the RCA web interface, and in Settings > User Management > Open ID Connect set the following values:
-
Enable OpenID Connect Login: True
-
Issuer location: Okta authorization server URL (see step 2. above)
-
Client ID: Same value as in Okta > RCA Application integration Settings > Client credentials
-
Client Secret: Same value as in Okta > RCA Application integration Settings > Client secret
-
Custom login method name: any value (this will be shown on the button of the RCA login screen)
-
Additional scope:
profile(if this is not specified, RCA will not be able to obtain the First and Last name of user from Okta and the generic Okta ID will be shown) -
Roles key:
groups(i. e. the word specified for claims in Okta) -
Domain groups: insert the name of the User Group defined in Okta (see requirements above)
Once all configuration is done, click the Save button.
How to use Runecast with Azure OpenID connect
This integration allows Runecast to use Azure OIDC credentials for authentication. To configure it, take the following steps:
-
Create a user group with users that will be allowed to log into Runecast
-
Log into the Azure portal and navigate to Microsoft Entra ID > Groups > New Group
-
Take the following steps:
-
Set Group type: Security
-
Set Group name: rca-sso-users (example)
-
Set Membership type: Assigned
-
Click Owners - add group Owner
-
Click Members - add users
-
-
-
Set up App registration
-
Navigate to Azure portal > Microsoft Entra ID > App registrations > All applications, select the name of the Enterprise application you have created in step 2.b.i. and click Authentication > Add a platform > Web
-
Add the Redirect URI in format https://10.1.1.1/rca/login/oauth2/code/login.microsoftonline.com
-
Make sure the ID tokens (used for implicit and hybrid flows) option is enabled
-
Click Configure
-
-
Navigate to Certificates and secrets and add a new certificate. Take note of its value, it is visible for only a short time.
-
Navigate to API permissions > Add permissions > Microsoft Graph > Delegated permissions. Search for openid, add the checkmarks to Openid - Sign users in and Add permissions.
-
Click the Grant admin consent for <your tenant> button. Once done, you should see green checkmarks next to each permission.
-
Navigate to App roles > Create app role and set the following values:
-
Display name (example): Global Readers
-
Allowed member types: Users/Groups
-
Value (example): Read-only
-
Fill the Description of the App role
-
Check the Do you want to enable this app role? option
-
-
Navigate to Overview and take note of
-
Issuer ID - To find it, click Endpoints, find OpenID Connect metadata document, and paste the value into a new browser window. Find the Issuer value and take note of it.
-
Client ID (Application ID) - this is visible directly in the Overview page.
-
-
-
Set up Enterprise application
-
Navigate to Azure portal > Microsoft Entra ID > Enterprise applications and select the app that you have created. Then click Users and groups, add the group you have created in step 1.b.ii (example: rca-sso-users), and click Assign.
-
Navigate to Microsoft Entra ID > Enterprise applications and select the app that you have created. Then click Users and groups, verify that all groups and users have assigned role from step 3.e.i, and that there are no Default access roles assigned.
-
-
Set up your Runecast instance
-
Log into the web interface of your Runecast instance with the 'rcuser' account and navigate to Menu > System settings > User management > OpenID Connect.
-
Enter Issuer ID
-
Enter Client ID
-
Enter Client secret
-
Enter Custom login method name
-
Enter Roles key with value: roles
-
Click Add group
-
Fill Group name with value used in step 3.e.iii - in this case Read-only.
-
Click Assign role > Global Read-only. This will grant Read-only RCA permissions to all users in Azure group from step 1 (rca-sso-users). Click the Add group button.
-
-
Click the Save button
-
Logout from Runecast
-
-
Navigate again to the authentication page of your Runecast web interface and use the login button (named as the value in step 5.e) to sign in with OIDC.
Known errors
"An error ocurred while attemting to decode the JWT: The ID token contains invalid claims"Reason: The OpenID configuration in RCA probably changed while your browser had already acquired JWT token.
Solution: Restart RCA
"Cannot obtain OIDC roles" (in rca-app.log)
Reason: Using mistmatched value in RCA OpenID Domain group name.
Solution: Locate your Azure App registration > App roles > Click the role you want to map to RCA roles > Note Value > Go to RCA > System settings > User management > OpenID Connect > Domain Groups > Add group > Insert Value from App role as Group name > assign Role > click assign
Organizations
Organizations feature allows you to group connected systems and limit access to them based on Active Directory or LDAP groups. The table view shows all available organizations, which user groups can access them and which systems are assigned to them.
To create new organization, follow the steps below:
- Click on the Create organization button
- Provide organization name
- Select AD or LDAP groups that will have access to the new organization. For a user group to appear in the list, it must have been configured with an organization specific role (Organization Admin or Organization Read-only) at the corresponding section in the User Management page. Global roles have access to all organizations.
- Confirm the action with the Create organization button
After creating the organization a new menu section will appear in the right corner of the top bar. It shows the currently selected organization and allows users with access to more than one organization to switch the organization context.
Global Admin users are allowed to move already connected systems across organizations. To achieve that:
- Click on the Assign system to organization button
- Select the desired system from the drop-down menu
- Select target organization for that system
- Confirm by clicking on the Assign system button
Filters
Filters can be used to disable a combination of configuration items and issues from showing in the reports and statistics. Without filters, Runecast Analyzer will include all configuration items it has access to for all possible issues and best practices. Typically, these are all inventory objects within the analyzed System.
There are many use cases for using filters, for example:
-
Some of the Security Hardening checks are not part of your specific security policy and you need to exclude them from reports.
-
You have several test ESXi hosts that you want to exclude from all reports, or perhaps you want to see only Critical issues detected for those hosts.
Click Add Filter to create a new filter. A new filter called New Filter appears in the list. Expand New Filter and edit its name and description. The filter configuration includes two hierarchical trees:
-
The left-hand tree displays the analyzed Systems with all the inventory objects underneath. Select which object or group of objects will this filter apply to.
-
The right-hand tree displays all possible issues organized by type (Knowledge Base, Best Practices, Security Hardening) and severity (Low, Medium, Major, Critical). Select an issue or a group of issues the filter will apply to.
To quickly search for an object or an issue, you can use the Search box under the respective tree.
Click Update once finished. The filter is applied to all views.
Click Export/Import button on the top right corner of the Filters view to Export or Import all filters. Choose one of the following options:
-
Export Filters exports all filters in a downloadable .dat file. This function will not export the inventory objects specified in the filters. Once you import the filters, you would need to specify the objects this filter applies to.
-
Export Filters including objects exports all filters and objects they apply to in a downloadable .dat file. This function can be used in case you plan to import the filters to a Runecast Analyzer appliance that is connected to the exact same System.
-
Import Filters imports filters from a .dat file. Filters have an OFF status once imported.
Note
In the case where the .dat file contains inventory objects, they will be added to the filters only if the System object ID and other object IDs match.
Filtering issues for the whole vCenter Server (including all child objects)
In case certain issues are filtered out for the whole vCenter Server, those issues will not appear in the issue list for the context of this specific vCenter Server.
If issues are filtered out for all connected vCenter Servers (including all their child objects), then the issues will also disappear in the All Systems context.
Below is an example screenshot of filtering out one specific rule for the whole vCenter Server system:

In this case, this issue will not appear any more in the context of this particular vCenter Server but will still show up in the context of All System, as it’s not filtered for all vCenter Servers connected to Runecast Analyzer.
Below is an example screenshot of filtering out one specific rule for all vCenter Servers:

In this case, this issue will not appear any more in the context of any of the filtered out vCenter Server, neither in the All Systems context.
Filtering issues for subset of the vCenter Server objects
In case certain issues are filtered out for a subset of the vCenter Server objects, those issues will still appear in the issue list. However, the objects which are filtered out will not be taken into consideration and if the issue ends up with 0 affected objects it will be marked with status Pass (or Configured for some of the security profiles).
Below is an example screenshot of filtering out one specific rule for a subset of the vCenter Server objects:
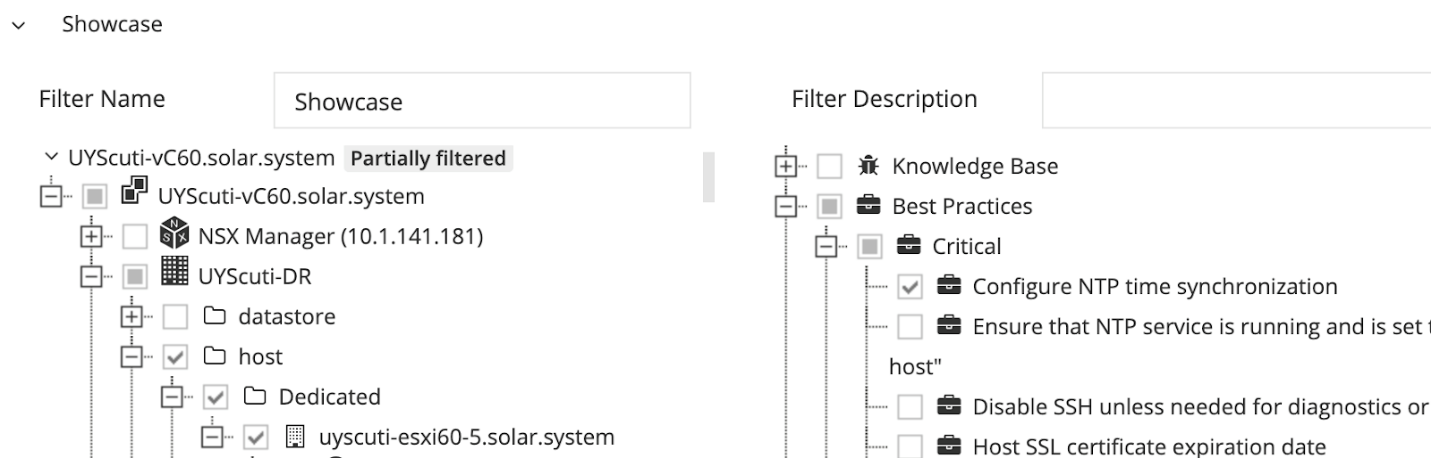
Note that the vCenter Server is marked as Partially filtered. In this case, the issue still appears in the issue list, and only the selected object scope will be filtered out. If the issue ends up with 0 affected objects, it will be marked with status Pass (or Configured for some of the security profiles).
Licenses
In this tab you can add and assign a valid license to your hosts. For more information see Licensing Runecast Analyzer.
Update
Within this tab the update status of Runecast Analyzer is shown. It is divided into two parts, Application and Knowledge Definition.
Application is consisting of updates to the OS, components, application, and database definitions like KB, BP, SH, etc. The version of the Runecast appliance currently deployed is displayed. This view differs based on the online/offline update state of the appliance:
-
If the appliance has an internet connection (online) then the application will check if there are any updates available. It will display one of two states: Up to date or Update available. If the status is Update available, you can perform manually the update by accessing Runecast Console Interface (check Note) and navigate to the Update section. Otherwise Runecast Analyzer will automatically apply the updates during the night.
-
If the appliance doesn’t have an internet connection (offline) then the status You are offline is displayed together with a link to the Customer portal. When accessing the portal through an internet connected device, expanding the Offline updates provides access to an .ISO file. Download the file and attach it to you Runecast Analyzer VM. You can perform the update manually by accessing Runecast Console Interface and navigate to the Update section.
Note
To access the Runecast Console Interface open Runecast Analyzer VM console and press F1 key to login. Check section Runecast Console Interface for additional details.
Knowledge Definition contains only data definition updates for knowledge such as KBs, BPs, SH, etc. The last update release date is displayed. The view differs based on the online/offline state of the appliance:
-
If the appliance has an internet connection (online) then the application will check if there are any updates available. It will display one of the following two states: Up to date or Update now.
-
If the appliance doesn’t have internet connection (offline) then You are offline is displayed together with a link to the Customer portal. When accessing the portal through an internet connected device, expanding the Offline updates provides access to the .bin file. To perform an update, Download the file and then import it into the appliance using the Choose File button.
Online application and knowledge definition updates require access to https://updates.runecast.com. The default repository link is displayed below each one.
Note
AWS deployed Runecast Analyzer automatically checks and installs updates. In case you need to update it manually, please login using SSH, and execute the script:
/opt/runecast/scripts/rcupdate.sh
A custom repository can be configured for both application and knowledge definition updates. Click the wrench icon located on the right-hand side and add the Custom URL of the packages repository from where you would like to automatically download the new version. Ensure that all required files are available.
Tip
To find out how to configure your own update repository, please see the section How to set up Custom Repositories with Runecast Analyzer.
API Access tokens
Runecast Analyzer offers a full REST API for custom integration, configuration and reporting.
In order to use the API, an access token is required. The token can be generated in the graphical interface of the Runecast Analyzer under Settings > API Access Tokens or by sending a POST request to /api/v1/users/local/<username>/tokens.
Once generated, the access token needs to be included in the Authorization header of each request. For example, to retrieve data about the vCenters registered in your Runecast appliance, you can use a call like:
curl -H "Authorization: <your token here>" -X GET https://<appliance IP>/rc2/api/v1/vcenters
Integrations
This section lists different options for native integration with 3rd party tools that can utilize findings from Runecast Analyzer.
Dynatrace
Ingest compliance findings to Dynatrace via OpenPipeline. This integration enables sending analysis results from security compliance knowledge profiles for AWS, Azure, GCP, vCenter and NSX-T connections.
Note
Unlicensed and filtered results are not sent to Dynatrace
Use the default security events ingest endpoint for automatic mapping of the findings to the Dynatrace compliance events schema, resulting in seamless integration with the rest of your compliance data.
Requirements:
- Dynatrace SaaS
- Security Posture Management app installed in your Dynatrace environment to benefit from ready-made dashboards displaying compliance findings
ServiceNow
Automatically create incident tickets based on predefined criteria using Runecast's plugin for ServiceNow. The latest version of the plugin and all necessary documentation is available in the customer's profile at https://portal.runecast.com/.
Jira
This functionality allows creation of Jira issues directly from Runecast Analyzer.
Requirements:
- Jira Server edition
- Basic authentication with username and password
- Jira issue type with mandatory fields:
- Summary - where the rule title is specified
- Description - contains metadata of the issue and the link to the Runecast Analyzer instance
- Labels - marks the Jira issue as being created from integration with Runecast
Follow the steps below to import reported issues by Runecast Analyzer to Jira:
- Enable Jira integration from Settings > Integrations > Jira
- Navigate to any issues page
- Use the Quick Filters and/or the Search available in the view to limit the scope of the issues to only those you would like to import to Jira
- Click on the Export button in the top right corner and select Create Jira issues
- Follow the wizard to provide details for one time Jira authentication, and on later steps select the project where you want the issues created. Before submitting you'll see a summary view of all issues that will be created
vSphere Client
View the Runecast findings in the context of each selected object from your vSphere Client inventory. Navigate to Runecast vSphere Client Plugin page for installation instructions.
Enterprise Console
The Enterprise Console feature activates a global dashboard that integrates results of all connected Analyzer instances. Check section EC Dashboard for additional details.